Introducción
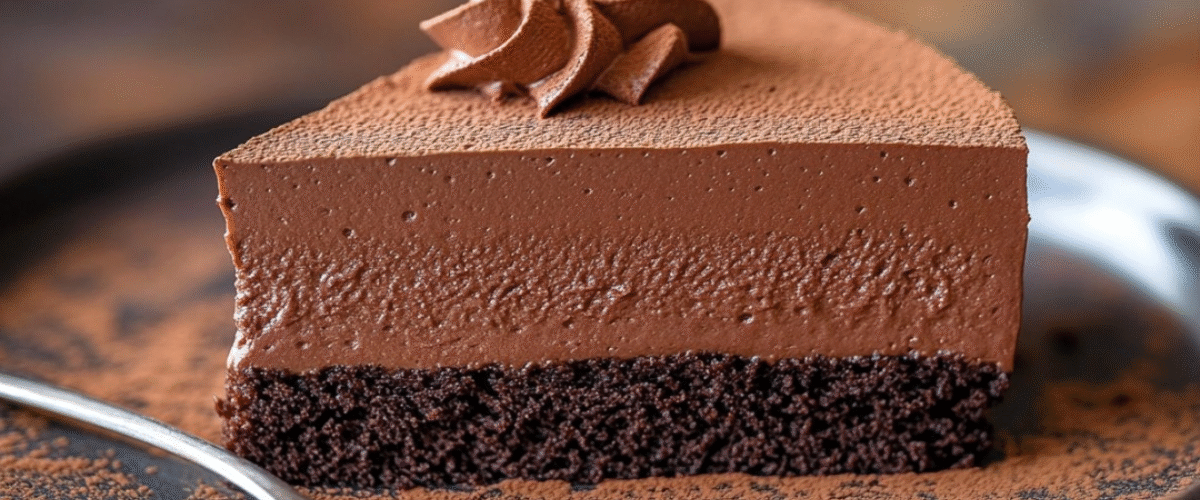
Prepárate para un viaje de ensueño para los amantes del chocolate con este exquisito pastel de mousse de chocolate que transforma los básicos de la despensa en una obra maestra. Esta creación sensacional presenta una base de pastel de chocolate húmedo cubierta con una mousse de chocolate cremosa y cremosa, con una textura cremosa y un sabor intenso. Cada bocado ofrece el equilibrio perfecto entre ricas notas de cacao y una cremosidad delicada que se derrite en la boca. Ya sea para celebrar una ocasión especial o simplemente para satisfacer tus antojos de chocolate, este elegante postre deleitará incluso a los paladares más exigentes. Y lo mejor de todo, a pesar de su sofisticada apariencia, esta receta es sorprendentemente accesible para reposteros caseros de todos los niveles.
Ingredientes
Para la capa de pastel de chocolate:
- 1 taza de harina para todo uso (115 g)
- ½ cucharadita de polvo para hornear (2-3 g)
- ½ cucharadita de bicarbonato de sodio (3 g)
- 2 cucharadas colmadas de cacao en polvo sin azúcar (30 g)
- ¾ taza de azúcar granulada (150 g)
- Una pizca de sal
- 1 huevo grande
- ¼ taza de aceite vegetal (60 ml)
- ½ taza de suero de leche o leche + ½ cucharada de jugo de limón/vinagre (120 ml)
- ½ taza de agua caliente (120ml)
Para el jarabe de café:
- ¼ taza de agua (60 ml)
- 2 cucharadas de azúcar (25 g)
- 1 cucharadita de café instantáneo
Para la mousse de chocolate:
- 7 oz de chocolate negro, 70% de contenido de cacao (200 g)
- 1⅓ tazas de crema espesa, para ganache (320 ml)
- 1 taza de crema espesa fría, para batir por separado (240 ml)
- 1 cucharada de azúcar (12 g)
Para el glaseado de chocolate opcional:
- 3,5 oz de chocolate negro (100 g)
- 1 cucharada de aceite vegetal (15 ml)
Opcional para decoración:
- Cacao en polvo sin azúcar para espolvorear
Instrucciones
Preparación de la base del pastel de chocolate:
- Precalienta el horno a 175 °C (350 °F). Cubre el fondo de un molde desmontable de 20 cm (8 pulgadas) con papel vegetal y engrasa los lados.
- En un tazón grande, tamice juntos la harina, el polvo para hornear, el bicarbonato de sodio, el cacao en polvo y la sal.
- Añade el azúcar y bate hasta que esté bien combinado.
- En un recipiente aparte, bate ligeramente el huevo y añade el aceite vegetal y el suero de leche (o leche con zumo de limón o vinagre). Mezcla bien.
- Vierta los ingredientes húmedos en los ingredientes secos y mezcle hasta que se combinen.
- Añade lentamente el agua caliente, removiendo suavemente. La masa quedará bastante líquida; esto es normal.
- Vierta la masa en el molde desmontable preparado.
- Hornee durante aproximadamente 30 minutos, o hasta que al insertar un palillo en el centro, éste salga limpio con algunas migas húmedas.
- Deje que el pastel se enfríe en el molde durante al menos 10 minutos antes de retirar los lados del aro desmontable.
- Deje que el pastel se enfríe completamente sobre una rejilla mientras prepara el almíbar de café y la mousse.
Preparación del jarabe de café:
- En una cacerola pequeña, combine el agua y el azúcar.
- Calentar a fuego medio, revolviendo hasta que el azúcar se disuelva completamente.
- Retirar del fuego, añadir el café instantáneo y remover hasta que se disuelva.
- Deje que el almíbar se enfríe a temperatura ambiente.
- Brush the cooled cake layer generously with the coffee syrup, ensuring even coverage.
Preparing the Chocolate Mousse:
- Chop the dark chocolate into small pieces and place in a heatproof bowl.
- Heat 1⅓ cups of heavy cream in a saucepan until it reaches 160-170°F (70-75°C). Do not let it boil.
- Pour the hot cream over the chopped chocolate and let it stand for 2 minutes.
- Stir gently until the chocolate is completely melted and the mixture is smooth and glossy.
- Allow the ganache to cool to room temperature, then refrigerate for 30-40 minutes until chilled but not set.
- In a separate bowl, whip the remaining 1 cup of cold heavy cream with 1 tablespoon of sugar until soft peaks form.
- Gently fold the whipped cream into the cooled chocolate ganache in three additions, maintaining as much air as possible for a light, fluffy mousse.
Assembling the Cake:
- Place the cooled, syrup-soaked cake back into the clean springform pan.
- Pour the chocolate mousse over the cake layer, smoothing the top with an offset spatula.
- Refrigerate for at least 4 hours, preferably overnight, until the mousse is completely set.
Preparing the Optional Chocolate Glaze:
- Chop the dark chocolate into small pieces.
- Melt the chocolate using a double boiler or in the microwave in 20-second intervals, stirring between each interval.
- Once melted, stir in the vegetable oil until the mixture is smooth and glossy.
- Allow the glaze to cool slightly but remain pourable.
- Remove the set cake from the refrigerator and carefully release the springform.
- Place the cake on a wire rack set over a baking sheet to catch drips.
- Pour the glaze over the top of the cake, allowing it to drip slightly down the sides.
- Return the cake to the refrigerator for 15-20 minutes to set the glaze.
Final Presentation:
- Just before serving, dust the top of the cake lightly with cocoa powder using a fine-mesh sieve.
- Carefully transfer to a serving plate.
- For clean slices, dip a sharp knife in hot water, wipe dry, and cut. Repeat between each slice.
Nutritional Information and Timing
Prep Time: 40 minutes Baking Time: 30 minutes Chilling Time: 4 hours (minimum) Total Time: 5 hours 10 minutes (including chilling) Servings: 10-12 slices
Nutritional Information (per slice, based on 12 servings):
- Calories: 380
- Protein: 4g
- Carbohydrates: 30g
- Fat: 28g
- Saturated Fat: 16g
- Cholesterol: 75mg
- Fiber: 3g
- Sugar: 22g
- Sodium: 120mg
Cooking Tips and Tricks
- Chocolate selection: The quality of chocolate significantly impacts the final flavor. Use the best quality dark chocolate you can afford, preferably with 70% cocoa content for a rich, not-too-sweet mousse.
- Room temperature ingredients: Ensure your eggs and milk are at room temperature for the cake batter to mix more evenly and rise better during baking.
- Don’t overmix: Once you add the flour to the wet ingredients, mix just until combined. Overmixing develops gluten, resulting in a tougher cake.
- Cream temperature control: When heating cream for the ganache, use a thermometer if possible. The ideal temperature range (160-170°F/70-75°C) helps the chocolate melt smoothly without separating.
- Folding technique: When incorporating whipped cream into the ganache, use a gentle cutting and folding motion with a spatula rather than stirring to preserve air bubbles and maintain a light texture.
- Clean-cut slices: For picture-perfect slices, dip a long knife in hot water, wipe it clean, and slice in one smooth motion. Clean and reheat the knife between each cut.
Variations and Substitutions
- Flavor enhancements: Add 1 teaspoon of vanilla extract to the cake batter or ½ teaspoon of espresso powder to intensify the chocolate flavor without adding coffee taste.
- Dairy alternatives: Substitute coconut cream for heavy cream to create a dairy-free version (note that the texture will be slightly different).
- Liqueur option: Replace 2 tablespoons of the coffee syrup with your favorite liqueur (Kahlúa, Grand Marnier, or Amaretto work beautifully) for an adult version.
- Layered delight: Create a triple-chocolate effect by dividing the mousse and adding white chocolate to one portion and milk chocolate to another, layering them for a stunning visual effect.
- Fruit addition: Add a layer of raspberry or cherry preserves between the cake and mousse for a fruity contrast to the rich chocolate.
- Gluten-free adaptation: Substitute the all-purpose flour with a gluten-free flour blend (plus ¼ teaspoon xanthan gum) for a gluten-free version.
Common FAQs
Can I make this cake in advance?
Yes! This cake actually benefits from being made 1-2 days in advance. The flavors develop and the mousse sets perfectly. Keep refrigerated and add the glaze and cocoa powder dusting just before serving.
Why did my chocolate seize when making the ganache?
Chocolate typically seizes when it comes in contact with even small amounts of water or if the cream is too hot. Ensure all utensils are completely dry and that the cream is hot but not boiling.
Can I freeze this cake?
Yes, you can freeze it without the glaze for up to 1 month. Wrap well in plastic wrap and aluminum foil. Thaw overnight in the refrigerator and add the glaze fresh before serving.
My mousse isn’t setting properly. What went wrong?
If your mousse is too soft, it might be because the cream wasn’t whipped to the right consistency or the ganache was too warm when you folded in the whipped cream. Try refrigerating it longer to see if it firms up.
Can I use milk chocolate instead of dark chocolate?
Sí, pero la mousse quedará más dulce y menos intensa. Considera reducir el azúcar añadido si usas chocolate con leche.
Consejos para almacenar y preparar con anticipación
- Refrigeración : Conserve el pastel tapado en el refrigerador hasta por 5 días. La textura es mejor en los primeros 3 días.
- Preparación de los componentes : La capa de pastel se puede hornear hasta con 3 días de anticipación, envolver bien y guardar a temperatura ambiente. El jarabe de café se puede preparar hasta con 1 semana de anticipación y guardar en el refrigerador.
- Consejos de congelación : Congele el pastel completo (sin glaseado) hasta por 1 mes. Descongélelo durante la noche en el refrigerador antes de glasear y servir.
- Transporte : Si va a transportar este pastel, manténgalo en el molde desmontable hasta su destino. Lleve el glaseado aparte para añadirlo al llegar, si es posible.
- Servir a temperatura ambiente : Para obtener el mejor sabor y textura, retire el pastel del refrigerador 15 a 20 minutos antes de servir para quitarle un poco el frío.
- Consejos para las sobras : Se pueden envolver rebanadas individuales en film transparente para preparar postres rápidos durante la semana. De hecho, el pastel sabe mejor al segundo día, ya que los sabores siguen desarrollándose.