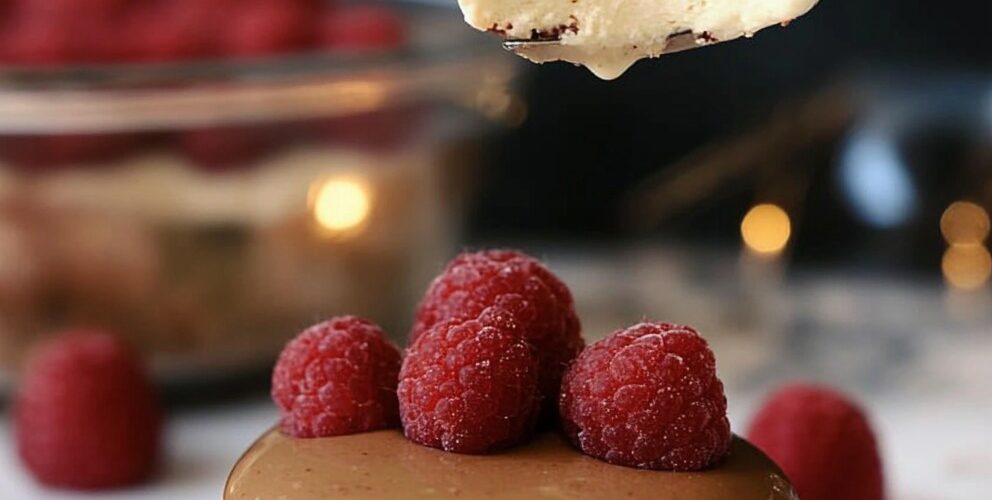
Un postre clásico italiano con un toque de chocolate
La panna cotta, que significa “crema cocida” en italiano, se ha considerado durante mucho tiempo uno de los postres más elegantes y, a la vez, sorprendentemente sencillos de Italia. Originaria de la región norteña del Piamonte, esta sedosa crema pastelera ha evolucionado desde sus humildes orígenes hasta convertirse en un sofisticado capricho presente en restaurantes de alta cocina de todo el mundo. Nuestra versión de chocolate, coronada con frambuesas frescas, eleva este clásico a un nuevo nivel al combinar la textura suave y delicada de la panna cotta tradicional con la exquisita exquisitez del chocolate.
Lo que hace a este postre tan especial es su impresionante atractivo visual, combinado con una notable simplicidad. El impactante contraste entre la cremosa base de chocolate blanco y la brillante capa superior de chocolate con leche crea un hermoso lienzo para vibrantes frambuesas rojas. A pesar de su impresionante aspecto, la panna cotta no requiere horneado, lo que la hace perfecta para las cálidas tardes de verano o como postre para preparar con antelación para recibir invitados.
La clave para una panna cotta perfecta reside en lograr la textura ideal: lo suficientemente firme como para mantener su forma al desmoldarla, pero lo suficientemente delicada como para vibrar ligeramente con cada cucharada. Añadir chocolate blanco a nuestra base crea una textura más rica en boca, a la vez que complementa la acidez natural de las frambuesas frescas. Cubierto con una suave capa de chocolate con leche que se agrieta agradablemente al comerlo, este postre ofrece múltiples texturas y sabores en cada bocado.
Ya sea para una cena romántica, para el final de una cena o simplemente como un capricho de lujo, esta panna cotta de chocolate con frambuesas frescas te encantará tanto visualmente como por su sabor. ¡Adelante, preparemos esta obra maestra italiana en tu propia cocina!
Ingredientes
Para la base de Panna Cotta:
- 2 tazas (480 ml) de crema espesa
- 1 taza (240 ml) de leche entera
- ⅓ taza (67 g) de azúcar granulada
- 2 cucharaditas (10 ml) de extracto puro de vainilla
- 2½ cucharaditas (7,5 g) de gelatina en polvo sin sabor
- 3 cucharadas (45 ml) de agua fría
- 113 g (4 oz) de chocolate blanco de alta calidad, finamente picado
Para la cobertura:
- 2 oz (57 g) de chocolate con leche, picado
- 1 taza (125 g) de frambuesas frescas
- 2 cucharadas (15 g) de cacao en polvo sin azúcar, para espolvorear
Instrucciones
Paso 1: Preparar la gelatina
- Vierta el agua fría en un recipiente pequeño y espolvoree el polvo de gelatina uniformemente sobre la superficie.
- Deje reposar la gelatina durante 5 minutos para que se ablande y absorba el agua. La gelatina debería estar completamente saturada y adquirir una apariencia translúcida e hinchada.
Paso 2: Calentar la mezcla de crema
- En una cacerola mediana, combine la crema espesa, la leche entera y el azúcar granulada.
- Coloque a fuego medio-bajo y caliente la mezcla, revolviendo ocasionalmente para disolver el azúcar por completo.
- Bring the mixture to a gentle simmer (small bubbles should form around the edges), but do not allow it to boil as high heat can damage the cream’s texture.
- Once simmering, remove the saucepan from the heat.
Step 3: Incorporate Gelatin and White Chocolate
- Add the bloomed gelatin to the hot cream mixture and whisk gently until the gelatin completely dissolves, about 1-2 minutes.
- Add the chopped white chocolate to the mixture.
- Whisk continuously until the chocolate melts fully and the mixture becomes smooth with no visible chocolate pieces.
- Stir in the vanilla extract until well combined.
Step 4: Strain and Pour
- For an extra silky texture, strain the mixture through a fine-mesh sieve into a large measuring cup or bowl with a pouring spout.
- Divide the mixture evenly among 6-8 ramekins, small glasses, or dessert cups depending on your preferred serving size.
- Gently tap each container against the counter to release any air bubbles that may have formed.
Step 5: Chill Until Set
- Allow the panna cottas to cool to room temperature, about 20-30 minutes.
- Cover each container with plastic wrap, making sure the plastic doesn’t touch the surface of the cream to prevent skin formation.
- Refrigerate for at least 4 hours, preferably overnight, until the panna cottas are completely set but still maintain a slight wobble in the center.
Step 6: Prepare the Chocolate Topping
- Once the panna cottas are fully set, prepare the chocolate topping.
- Place the chopped milk chocolate in a microwave-safe bowl.
- Heat in 20-second intervals at 50% power, stirring between each interval until the chocolate is almost completely melted.
- Remove and continue stirring until the remaining chocolate melts from the residual heat. This prevents overheating and ensures a smooth consistency.
Step 7: Assemble and Garnish
- Spoon a thin layer of melted milk chocolate over each panna cotta, tilting to create an even coating.
- Return to the refrigerator for 5-10 minutes to allow the chocolate to set slightly but not become completely hard.
- Arrange 3-4 fresh raspberries on top of each dessert.
- Just before serving, dust the plates with cocoa powder using a small sieve for an elegant presentation.
Nutritional Information and Timing
Preparation Time: 20 minutes
Chilling Time: Minimum 4 hours (preferably overnight)
Assembly Time: 15 minutes
Total Time: 4 hours 35 minutes
Servings: 6-8 individual portions
Nutritional Information (per serving, based on 6 servings):
- Calories: 425 kcal
- Protein: 5 g
- Carbohydrates: 25 g
- Fat: 35 g
- Saturated Fat: 22 g
- Cholesterol: 120 mg
- Fiber: 2 g
- Sugar: 20 g
- Sodium: 60 mg
Note: Nutritional values are approximate and may vary based on specific ingredients used.
Cooking Tips and Tricks
For Perfect Panna Cotta Every Time:
- The Gelatin Test: To ensure your panna cotta will set properly, perform the “spoon test” before pouring into molds. Dip a spoon into the mixture and run your finger across the back—if it leaves a clear path, your mixture is properly thickened.
- Temperature Control: Never boil the cream mixture, as high temperatures can break down the gelatin’s setting properties and affect the final texture. A gentle simmer is all you need.
- Chocolate Selection: Use high-quality chocolate for both the base and topping. Lower quality chocolates contain more additives and less cocoa butter, which can affect both flavor and texture.
- Unmolding Technique: If you plan to unmold your panna cottas rather than serving them in their containers, dip the bottom of each ramekin in hot water for 3-5 seconds, then run a thin knife around the edge before inverting onto a plate.
- Gelatin Precision: Measure your gelatin carefully—too much will create a rubbery texture, while too little will result in panna cotta that doesn’t hold its shape.
- Smooth Chocolate Layer: For an extra glossy chocolate top layer, add ½ teaspoon of neutral oil (like grapeseed) to the melted chocolate before spreading it on top.
- Prevent Skin Formation: If not covering with plastic wrap while chilling, dust the surface with a tiny amount of powdered sugar to prevent skin from forming.
- Serve at the Right Temperature: Remove panna cottas from the refrigerator 10-15 minutes before serving to allow the flavors to fully develop at a slightly warmer temperature.
Variations and Substitutions
Alternative Flavor Profiles:
- Dark Chocolate Version: Replace the white chocolate in the base with 3 oz (85 g) of dark chocolate (70% cocoa content) for a more intense chocolate flavor. Use white chocolate for the top layer to create a striking reverse color contrast.
- Dairy-Free Option: Substitute the heavy cream and milk with full-fat coconut milk and coconut cream. Use dairy-free chocolate for both the base and topping. Increase the gelatin to 3 teaspoons for proper setting.
- Coffee Infusion: Add 1 tablespoon of instant espresso powder to the cream mixture before heating for a mocha-flavored panna cotta that pairs beautifully with the chocolate and raspberries.
- Liqueur Enhancement: Replace 1 tablespoon of the milk with Chambord (raspberry liqueur), Grand Marnier, or Frangelico for an adult version with subtle complexity.
- Berry Variation: Replace raspberries with a mixture of seasonal berries like strawberries, blackberries, and blueberries for a colorful medley.
Ingredient Substitutions:
- Sugar Alternatives: Replace granulated sugar with an equal amount of honey or maple syrup for different flavor notes. If using liquid sweeteners, reduce the milk by 1 tablespoon.
- Gelatin Substitutes: For a vegetarian version, substitute the gelatin with 2 tablespoons of agar-agar powder, but note that the texture will be slightly different.
- Light Version: Use half-and-half instead of heavy cream and 2% milk instead of whole milk for a lighter dessert with approximately 30% fewer calories.
- Chocolate Substitutions: Ruby chocolate can replace white chocolate in the base for a naturally pink hue and subtle berry flavor that complements the raspberries beautifully.
- Garnish Alternatives: Instead of cocoa powder, try finely chopped pistachios, toasted coconut flakes, or edible gold dust for different visual effects and flavor combinations.
Common FAQs
Q1: Why didn’t my panna cotta set properly?
A: Several factors can prevent proper setting. The most common include: not allowing the gelatin to bloom completely before adding it to the warm mixture; overheating the cream mixture (which damages the gelatin’s setting properties); or incorrect gelatin measurement. Remember that gelatin strength can vary by brand, so you might need to adjust slightly based on the specific product you’re using.
Q2: Can I make chocolate panna cotta ahead of time?
A: Absolutely! Panna cotta is the perfect make-ahead dessert. You can prepare it up to 3 days in advance and keep it covered in the refrigerator. Add the chocolate topping and berries no more than 24 hours before serving for the freshest presentation.
Q3: My chocolate topping cracked when I tried to eat the panna cotta. Is this normal?
A: Yes, the chocolate layer is supposed to create a slight crack when your spoon breaks through it—similar to a crème brûlée’s caramelized sugar top. If you prefer a softer topping, add 1 teaspoon of heavy cream to your melted chocolate before spreading it on the panna cotta.
Q4: Can I freeze panna cotta for longer storage?
A: While technically possible, freezing isn’t recommended as it can alter the delicate texture of panna cotta. The gelatin structure may break down during thawing, resulting in a grainy or separated dessert. This recipe is best enjoyed fresh within 3-4 days of preparation.
Q5: How do I know when my panna cotta is perfectly set?
A: A properly set panna cotta should have a slight wobble in the center when gently shaken—similar to Jell-O but more delicate. It should hold its shape when unmolded but still retain a creamy, silky texture when you put your spoon through it. If it’s completely firm with no movement, it may be overcooked or contain too much gelatin.
Storage and Make-Ahead Tips
Refrigerator Storage:
- Guarde las panna cottas preparadas, cubiertas con film transparente, en el refrigerador hasta por 3 días.
- Para obtener el mejor atractivo visual, agregue la cobertura de chocolate no más de 24 horas antes de servir.
- Añade frambuesas frescas justo antes de servir para evitar que suelten jugo sobre la capa de chocolate.
Preparación de componentes con antelación:
- La base de panna cotta se puede preparar y verter en platos para servir hasta 3 días antes.
- La cobertura de chocolate se puede preparar por separado y guardar en un recipiente hermético a temperatura ambiente hasta por 2 días. Recalentar suavemente en el microondas al 50 % de potencia en intervalos de 15 segundos hasta que esté apenas untable.
Servicio desde almacenamiento:
- Para obtener una textura y un sabor óptimos, retire las panna cottas del refrigerador 10 a 15 minutos antes de servir.
- Si la capa de chocolate ha estado refrigerada durante más de unas horas, dejarla calentar ligeramente mejorará el contraste entre la panna cotta fría y la cobertura de chocolate.
Consejos de transporte:
- Para comidas compartidas o cenas, transporte las panna cottas en sus envases originales (sin desmoldar).
- Llevar las frambuesas frescas y el cacao en polvo por separado y montarlos justo antes de servir.
- Coloque los recipientes individuales en una fuente para hornear poco profunda con una capa de toallas de papel para evitar que se muevan durante el transporte.
Reviviendo las sobras de panna cotta:
- Si después de varios días la panna cotta comienza a supurar o a soltar líquido, sírvala con el líquido como salsa o incorpórelo suavemente al postre.
- Transforme las sobras de panna cotta en un batido lujoso mezclándolo con una pequeña cantidad de leche y hielo.
Esta panna cotta de chocolate con frambuesas frescas combina la tradición italiana con la elegancia moderna. El contraste entre la sedosa base de chocolate blanco, la crujiente cobertura de chocolate con leche y las brillantes y ácidas frambuesas crea un postre visualmente impactante y con un sabor perfectamente equilibrado. Ya sea para impresionar a sus invitados o como un capricho especial, este refinado postre ofrece resultados de calidad de restaurante con un esfuerzo sorprendentemente bajo. La facilidad de preparación de la panna cotta también la hace ideal para recibir invitados, permitiéndole concentrarse en disfrutar de su compañía en lugar de preocuparse por la preparación del postre a última hora.