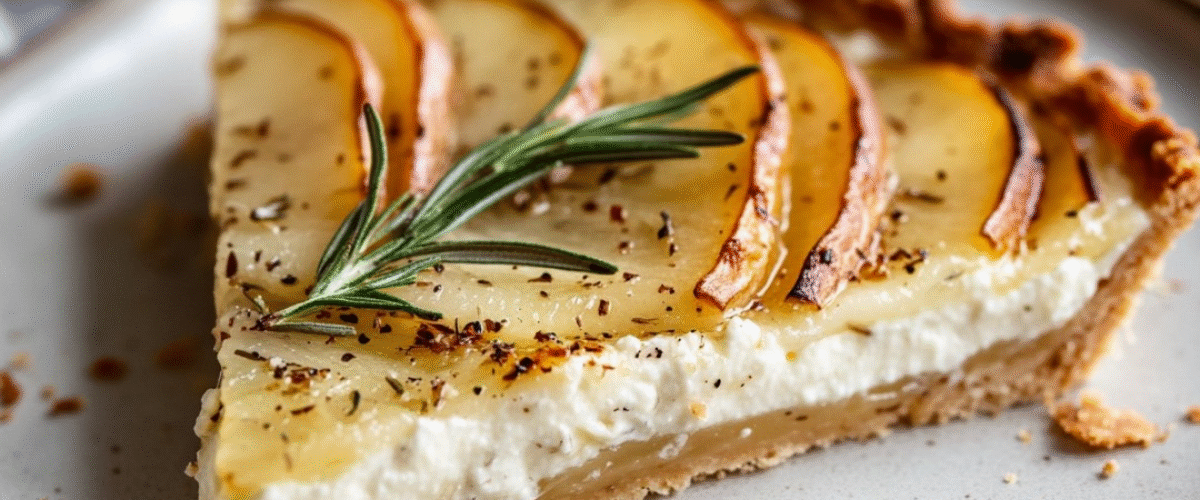
Esta elegante tarta de ricotta de pera y romero combina elementos terrosos, dulces y salados en perfecta armonía. La rústica corteza de avena y avellana proporciona una base nutritiva para el cremoso relleno de ricotta con hierbas, mientras que las delicadas rodajas de pera crean una presentación visual impactante. Perfecta para el brunch, la merienda o un postre más ligero, esta tarta de temporada combina a la perfección lo dulce y lo salado.
Ingredientes
Para la corteza
- 160 g (1¾ tazas) de avena arrollada
- 80 g (½ taza) de avellanas tostadas
- 1 huevo grande
- 3 cucharadas (45 ml) de aceite de oliva
- 1 cucharada (15 ml) de jarabe de arce
- ¼ cucharadita de sal marina
Para el relleno
- 4 peras firmes Bosc o Anjou (unos 800 g)
- 250 g (1 taza) de queso ricotta
- 1 huevo
- 1 cucharada de romero fresco, finamente picado
- 2 cucharaditas de ralladura de limón
- 2 cucharadas de jugo de limón
- 2 cucharadas de jarabe de arce
- ½ cucharadita de extracto de vainilla
- ¼ de cucharadita de pimienta negra recién molida
- Una pizca de sal marina
Instrucciones
Preparando la corteza
- Precalienta el horno a 175 °C (350 °F). Cubre el fondo de un molde para tarta de 23 cm con base desmontable con papel vegetal.
- Añade la avena arrollada y las avellanas tostadas a un procesador de alimentos. Tritura hasta obtener una harina gruesa con algo de textura.
- Añade el huevo, el aceite de oliva, el jarabe de arce y la sal al procesador de alimentos. Pulsa varias veces hasta que la mezcla se integre al presionarla entre los dedos. La mezcla debe quedar ligeramente pegajosa, pero no húmeda.
- Transfiera la mezcla de la base al molde para tarta preparado. Con los dedos o la base plana de una taza medidora, presione la mezcla firme y uniformemente en el fondo y aproximadamente 4 cm por los lados del molde.
- Utilice un tenedor para pinchar la base de la masa varias veces para evitar que se hinche durante la cocción.
- Coloque el molde de tarta en una bandeja para hornear y hornee en el horno precalentado durante 10 minutos. Retire del horno y deje enfriar un poco mientras prepara el relleno. Mantenga el horno encendido a la misma temperatura.
Preparación de las peras y el relleno
- Quita el corazón de las peras y córtalas en rodajas finas (de aproximadamente ⅛ de pulgada de grosor), ya sea en forma vertical u horizontal, según la presentación preferida.
- Coloque las rodajas de pera en un bol y mezcle suavemente con el jugo de limón para evitar que se doren y agregar un toque de brillo a su sabor.
- En un tazón mediano, combine la ricota, el huevo, el romero fresco finamente picado, la ralladura de limón, el jarabe de arce, el extracto de vainilla, la pimienta negra recién molida y una pizca de sal marina. Bata hasta obtener una mezcla suave y homogénea.
Montaje y horneado de la tarta
- Extiende la mezcla de ricota uniformemente sobre la masa precocida, usando una espátula para alisar la superficie.
- Coloca las rodajas de pera en círculos concéntricos sobre el relleno de ricotta, superponiéndolas ligeramente para una presentación decorativa. Empieza por el borde exterior y avanza hacia el centro.
- Gently press the pear slices slightly into the ricotta filling to ensure they adhere well.
- Return the tart to the oven and bake for 35-40 minutes, until the filling is set (it should have just a slight jiggle in the center) and the pears are tender with lightly golden edges.
- Remove from the oven and place the tart pan on a wire rack. Allow the tart to cool in the pan for at least 30 minutes before removing the sides and slicing.
Nutritional Information
Per serving (based on 8 slices):
- Calories: 275
- Total Fat: 14g
- Saturated Fat: 3g
- Cholesterol: 60mg
- Sodium: 125mg
- Total Carbohydrates: 31g
- Dietary Fiber: 5g
- Sugars: 15g
- Protein: 9g
Preparation Time: 25 minutes Cooking Time: 45-50 minutes Total Time: Approximately 1 hour 15 minutes, plus cooling time
Cooking Tips and Tricks
- Toasting hazelnuts: For the best flavor, toast hazelnuts in a 350°F (175°C) oven for 8-10 minutes until fragrant and skins begin to crack. Rub in a clean kitchen towel to remove some of the skins.
- Pear selection: Choose pears that are ripe but still firm for best results. If the pears are too soft, they’ll release too much moisture during baking and could make the tart soggy.
- Crust thickness: When pressing the crust into the pan, aim for even thickness throughout. Pay special attention to the corners where the bottom and sides meet, as these areas tend to get too thick.
- Ricotta tip: For a smoother filling, you can process the ricotta briefly in a food processor before adding the other filling ingredients.
- Pear arrangement: Slice the pears thinly and consistently for even cooking and an attractive appearance. Try different arrangements – concentric circles, a spiral pattern, or even a fan shape – for visual impact.
- Testing doneness: The tart is ready when the filling is mostly set but still has a slight jiggle in the center. It will continue to set as it cools.
Variations and Substitutions
Fruit Alternatives:
- Apple Variation: Substitute thinly sliced apples (such as Honeycrisp or Pink Lady) for a more robust fall flavor.
- Stone Fruit Option: During summer, try using plums or apricots instead of pears.
- Berry Addition: Scatter a handful of fresh berries between the pear slices for pops of color and tartness.
Crust Adaptations:
- Nut Substitutions: Replace hazelnuts with almonds, walnuts, or pecans based on preference.
- Gluten-Free Certainty: Ensure oats are certified gluten-free if preparing for someone with celiac disease.
- Vegan Crust: Use a flax egg (1 tablespoon ground flaxseed mixed with 3 tablespoons water, left to gel for 10 minutes) instead of the egg.
Flavor Variations:
- Herb Swaps: Try thyme or sage instead of rosemary for different aromatic profiles.
- Sweetener Options: Substitute honey for maple syrup (though this will change the flavor profile slightly).
- Spice Additions: Add ¼ teaspoon of cardamom or cinnamon to the filling for a warming spice element.
Dietary Modifications:
- Lower Fat: Use part-skim ricotta and reduce olive oil to 2 tablespoons.
- Dairy-Free: Substitute cashew cream for ricotta (blend 1 cup soaked cashews with ¼ cup water until very smooth).
- Higher Protein: Add 2 tablespoons of unflavored protein powder to the crust mixture.
Common FAQs
Q: Can I make this tart ahead of time?
A: Yes! The tart can be made up to 24 hours in advance and stored in the refrigerator. Let it come to room temperature for about 30 minutes before serving for the best flavor and texture.
Q: My crust seems crumbly. What am I doing wrong?
A: The crust mixture might be too dry. Add an extra teaspoon of olive oil or a small amount of water, one teaspoon at a time, until the mixture holds together when pressed between your fingers.
Q: The pears turned brown before I could arrange them. How can I prevent this?
A: Work quickly after slicing the pears and make sure to toss them immediately with lemon juice. You can also prepare the ricotta filling first so it’s ready when you finish slicing the pears.
Q: Can I freeze this tart?
A: While possible, freezing is not ideal as the texture of the ricotta filling may change upon thawing. If you must freeze it, wrap well in plastic wrap and aluminum foil, freeze for up to one month, and thaw overnight in the refrigerator.
Q: How do I know when the tart is properly baked?
A: The filling should be mostly set with just a slight jiggle in the center when you gently shake the pan. The edges of the pears should be lightly golden, and the crust should be firm and golden brown.
Storage and Make-Ahead Tips
- Room Temperature: The tart can be kept at room temperature for up to 2 hours before serving.
- Refrigeration: Store leftovers in an airtight container or wrapped in plastic wrap in the refrigerator for up to 3 days.
- Reheating: While delicious cold, you can warm individual slices in a 300°F (150°C) oven for 10 minutes if preferred.
- Make-Ahead Components: The crust can be prepared and pre-baked a day ahead and stored at room temperature, covered. The ricotta filling can also be prepared a day ahead and refrigerated separately.
- Serving suggestions: For an elegant presentation, dust with a little powdered sugar just before serving, or drizzle with a small amount of honey. Serve alongside a dollop of whipped cream or a spoonful of Greek yogurt for added creaminess.
- Consejo de transporte: si la va a llevar a una reunión, mantenga la tarta en su molde hasta llegar a su destino para proteger el delicado relleno y la corteza.
Esta tarta de ricotta de pera y romero con base de avena y avellanas es un magnífico ejemplo de cómo ingredientes saludables pueden transformarse en un plato elegante, ideal para ocasiones especiales. La combinación de delicadas peras, aromático romero y cremosa ricotta crea un perfil de sabor sofisticado, reconfortante y refinado. Ya sea como postre ligero, como plato principal para un brunch o para acompañar el té de la tarde, esta versátil tarta sin duda impresionará con su aspecto profesional y sus sabores armoniosos.