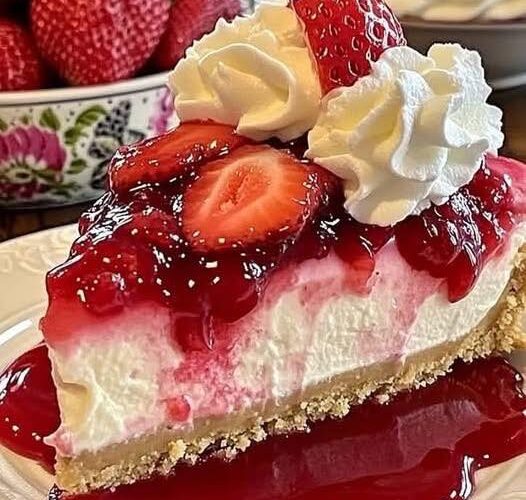
Hay algo irresistiblemente tentador en una tarta de queso con fresas perfectamente elaborada: su base crujiente y mantecosa, su relleno sedoso y su vibrante cobertura de frutos rojos frescos. Esta versión sin horno combina la cremosidad del mascarpone y el yogur griego con la dulzura natural de las fresas frescas, todo sobre una base de galleta con chispas de chocolate. Y lo mejor de todo: ¡puedes preparar este postre espectacular sin necesidad de encender el horno!
Ingredientes
Para la base:
- 200 g (7 oz) de galletas de mantequilla/galletas graham
- 150 g (⅔ taza) de mantequilla sin sal
- 50 g (1,8 oz) de chocolate negro
Para el relleno:
- 700 g (3 tazas) de yogur griego
- 300 g (10,5 oz) de mascarpone
- 2 cucharadas de jugo de limón
- 120 g (½ taza) de azúcar granulada
- 1 paquete (8 g) de azúcar de vainilla (o 1 cucharadita de extracto de vainilla)
- 6 hojas (12 g) de gelatina (o 3 cucharaditas de gelatina en polvo)
- 300 g (1¼ tazas) de crema espesa
Para la cobertura:
- 600 g (21 oz/aproximadamente 4 tazas) de fresas frescas
- 120 g (½ taza) de mermelada de fresa
También necesitarás:
- 1 bolsa para congelador
- Molde desmontable de 24-26 cm (9-10 pulgadas)
Instrucciones
- Prepara la base de galleta : Coloca las galletas de mantequilla en una bolsa para congelar y tritúralas finamente con un rodillo. También puedes usar un procesador de alimentos para este paso.
- Añadir el chocolate : Derretir la mantequilla en una cacerola pequeña a fuego lento o en el microondas. Rallar el chocolate negro. Mezclar la mantequilla derretida con las galletas trituradas hasta que estén bien humedecidas y luego incorporar el chocolate rallado.
- Forma la base : Coloca el borde de un molde desmontable (24-26 cm de diámetro) sobre un plato plano. Presiona la mezcla de galletas firmemente contra la base para crear una capa uniforme. Refrigera durante unos 25 minutos para que cuaje.
- Preparación de la gelatina : Mientras la base se enfría, remoje las láminas de gelatina en agua fría de 5 a 10 minutos hasta que estén blandas. Si usa gelatina en polvo, espolvoréela con 6 cucharadas de agua fría y déjela reposar 5 minutos.
- Preparación del relleno : En un tazón grande, combine el yogur griego, el mascarpone, el jugo de limón, el azúcar y el azúcar de vainilla. Mezcle hasta obtener una mezcla suave y homogénea.
- Incorporar la gelatina : Escurrir el exceso de agua de las láminas de gelatina ablandadas. Disuélvalas calentándolas suavemente en una cacerola pequeña o en el microondas (sin que hiervan). Tomar de 3 a 4 cucharadas de la mezcla de yogur y mascarpone e incorporarla a la gelatina disuelta. Luego, incorporar esta mezcla al tazón principal de yogur y mascarpone con movimientos envolventes hasta que esté completamente incorporada.
- Añadir la nata : En un bol aparte, bate la nata para montar hasta que forme picos firmes. Incorpora la nata montada a la mezcla de yogur y mascarpone con movimientos envolventes hasta que esté bien integrada, manteniendo la mayor cantidad de aire posible.
- Assemble: Pour the cream filling over the chilled biscuit base, smoothing the top with a spatula. Refrigerate for 2-3 hours, or ideally overnight, until the filling is completely set.
- Prepare strawberries: Wash, hull, and halve the strawberries. Arrange them decoratively on top of the set cheesecake.
- Add glaze: Warm the strawberry jelly in a small saucepan until it becomes liquid. Using a spoon, carefully drizzle or brush the warmed jelly over the arranged strawberries. Return the cheesecake to the refrigerator to allow the glaze to set, about 30 minutes.
- Serve: Carefully remove the springform rim before serving. For clean slices, dip your knife in hot water between cuts.
Nutritional Information and Timing
Prep Time: 40 minutes
Setting Time: Minimum 3 hours (preferably overnight)
Total Time: 3 hours 40 minutes (minimum)
Servings: 12 slices
Nutritional Information (per slice):
- Calories: 420
- Protein: 7g
- Carbohydrates: 28g
- Fat: 32g
- Fiber: 1g
- Sugar: 21g
- Sodium: 170mg
Cooking Tips and Tricks
- Temperature matters: Ensure all dairy ingredients are at room temperature before mixing to prevent lumps in your filling.
- Perfect base: For an extra-firm base, press the biscuit mixture down using the bottom of a glass or measuring cup.
- Gelatin technique: When incorporating gelatin, make sure it’s completely dissolved but not too hot when added to the cream mixture, or it may set prematurely.
- Smooth filling: For an ultra-smooth texture, pass the Greek yogurt through a fine sieve before mixing with other ingredients.
- Clean cuts: For picture-perfect slices, dip your knife in hot water and wipe clean between each cut.
- Preventing cracking: Allow the cheesecake to set in the refrigerator gradually rather than placing it in the freezer to speed up the process.
- Base variations: To enhance the chocolate flavor, use chocolate biscuits instead of plain butter biscuits.
Variations and Substitutions
- Berry alternatives: Replace strawberries with raspberries, blueberries, or a mixed berry combination for different flavor profiles.
- Dairy options: Substitute part or all of the Greek yogurt with sour cream for a tangier flavor, or use cream cheese instead of mascarpone for a more traditional cheesecake taste.
- Lighter version: Use low-fat Greek yogurt and light cream cheese to reduce calories without sacrificing too much flavor.
- Vegan adaptation: Replace dairy ingredients with plant-based alternatives such as coconut cream, cashew cream, and vegan cream cheese. Use agar-agar instead of gelatin.
- Citrus twist: Add lemon or lime zest to the filling for a refreshing citrus note that complements the strawberries beautifully.
- Chocolate lover’s version: Add 100g of melted white chocolate to the filling mixture, or drizzle the finished cake with dark chocolate for an extra decadent touch.
- Nutty base: Add 50g of finely chopped hazelnuts or almonds to the biscuit base for added texture and flavor.
Common FAQs
Q: Can I make this cheesecake without gelatin?
A: Yes, you can substitute the gelatin with 2 tablespoons of cornstarch dissolved in a little cold water and then heated until thickened, or use agar-agar following package instructions. The texture will be slightly different but still delicious.
Q: My cheesecake filling hasn’t set properly. What went wrong?
A: This usually happens when the gelatin wasn’t properly dissolved or incorporated, or if the cheesecake didn’t chill long enough. Give it more time in the refrigerator, or for a quick fix, place it in the freezer for 30-60 minutes.
Q: Can I use frozen strawberries for the topping?
A: Fresh strawberries work best for the topping as they hold their shape and have better texture. However, frozen strawberries can be used in the filling or made into a sauce, but they tend to release too much moisture when thawed for the topping.
Q: How far in advance can I make this cheesecake?
A: You can prepare the cheesecake base and filling 2 days in advance, but it’s best to add the fresh strawberry topping within 24 hours of serving.
Q: Why did my filling curdle when I added the gelatin?
A: If the gelatin mixture is too hot when added to the cream filling, it can cause curdling. Always let the dissolved gelatin cool slightly before incorporating it, and mix a small amount of the filling into the gelatin first before adding it back to the main mixture.
Storage and Make-Ahead Tips
- Refrigerator storage: This cheesecake will keep well in the refrigerator for up to 3-4 days. Cover loosely with plastic wrap or place in an airtight container to prevent it from absorbing other food odors.
- Freezing option: The cheesecake can be frozen without the strawberry topping for up to 1 month. Wrap it well in plastic wrap and aluminum foil. Thaw overnight in the refrigerator and add fresh strawberry topping before serving.
- Component prep: You can prepare different elements ahead of time – make the base up to 3 days in advance and keep refrigerated; prepare the filling a day ahead; add strawberries and glaze on the day of serving.
- Traveling with cheesecake: If transporting the cheesecake, freeze it for 1-2 hours beforehand (not completely frozen) to help it maintain its shape during transit.
- Para evitar que se empape : Si se prepara con bastante antelación, considere untar la base de galleta con chocolate derretido y dejar que cuaje antes de añadir el relleno. Esto crea una barrera que evita que la base se empape.
Esta tarta de queso con fresas sin horno es perfecta para los cálidos días de verano cuando no quieres encender el horno, o como postre para preparar con antelación para recibir invitados. La combinación de relleno cremoso, base crujiente y fresas frescas la convierte en una delicia que sin duda impresionará a familiares y amigos.