Introducción
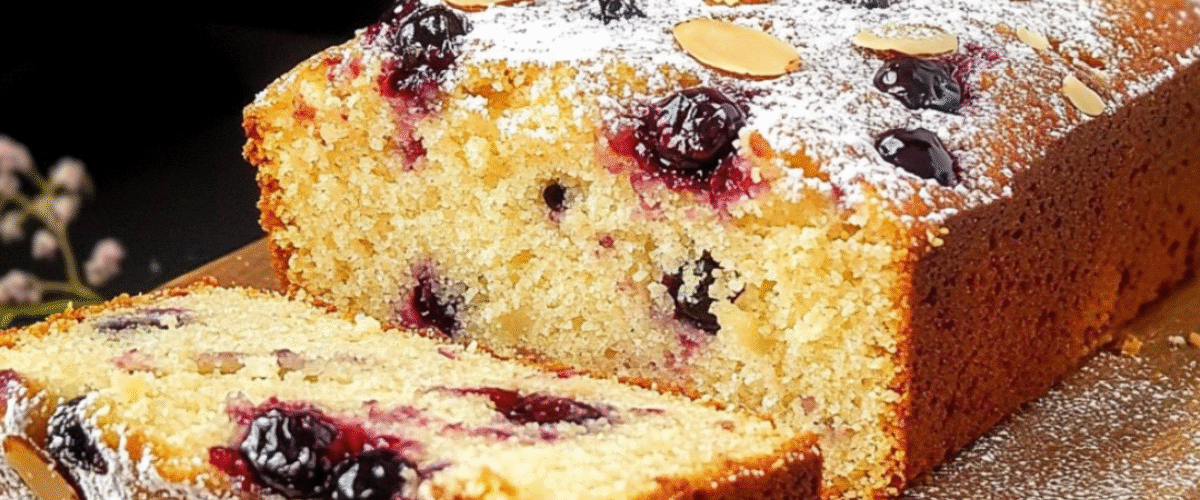
Este delicioso pastel de almendras y frutos rojos combina la miga ligera y tierna de un pastel tradicional con el brillo y la jugosidad de los frutos rojos de temporada y el sutil crujido de las almendras laminadas. Listo para mezclar y listo para hornear en solo 15 minutos, esta versátil receta es perfecta para una recepción de última hora, un brunch de fin de semana o un dulce postre con té o café. La combinación de frutos rojos ácidos y una masa dulce con aroma a vainilla crea un equilibrio perfecto de sabores, mientras que el azúcar glas espolvoreado le da un toque de elegancia a este postre sencillo pero impresionante. Ya sea que uses frutos rojos frescos en verano o congelados en invierno, este pastel siempre ofrece resultados maravillosos.
Ingredientes
Para la masa del pastel:
- 3 huevos grandes, a temperatura ambiente
- 120 g (½ taza + 1 cucharada) de azúcar granulada
- Extracto de vainilla o azúcar de vainilla, al gusto.
- ⅓ cucharadita de sal
- 100 g (⅓ taza + 1 cucharada) de leche
- 80 g (⅓ taza) de aceite vegetal neutro (como girasol o canola)
- 200 g (1⅔ tazas) de harina de trigo para todo uso
- 1 cucharadita de polvo para hornear
Para el relleno y la cobertura:
- 120 g (1 taza) de bayas (en la imagen se utilizan cerezas y grosellas congeladas, pero cualquier baya funciona)
- 1 cucharadita de maicena (o fécula de patata)
- Un puñado de almendras en láminas (opcional)
- Azúcar en polvo para espolvorear (opcional)
Instrucciones
Preparación de la masa:
- Precalienta el horno a 180 °C (356 °F). Engrasa y forra un molde para hornear (de aproximadamente 23 x 17 cm o 9 x 7 pulgadas) con papel vegetal.
- En un tazón grande, casca los 3 huevos y añade aproximadamente la mitad del azúcar (60 g). Bate hasta que la mezcla blanquee y espese ligeramente.
- Añade el extracto de vainilla o el azúcar de vainilla y la sal a la mezcla de huevo.
- Vierta la leche y el aceite vegetal y revuelva hasta que se combinen.
- Añade gradualmente aproximadamente la mitad de la harina (100 g) a los ingredientes húmedos, revolviendo lenta y cuidadosamente para evitar grumos.
- Añade el azúcar restante (60 g) y revuelve para incorporar.
- Mezcla el polvo para hornear con la harina restante (100 g) y añade gradualmente esta mezcla a la masa, removiendo suavemente hasta que esté bien integrada. Ten cuidado de no mezclar demasiado; no importa si quedan algunos grumos.
Preparación de las bayas:
- Si usa bayas congeladas, no las descongele por completo: las bayas parcialmente descongeladas o aún congeladas funcionan mejor ya que no perderán demasiado color en la masa.
- En un tazón pequeño, mezcle las bayas con una cucharadita de maicena. Esto ayuda a absorber el exceso de humedad de las bayas durante el horneado.
Montaje y horneado del pastel:
- Vierta aproximadamente dos tercios de la masa en el molde para hornear preparado, distribuyéndola uniformemente.
- Esparce la mayoría de las bayas preparadas sobre la masa.
- Vierta la masa restante sobre las bayas, tratando de cubrirlas lo máximo posible.
- Distribuye las bayas restantes sobre la masa y espolvorea con almendras en hojuelas.
- Place the baking dish in the preheated oven and bake for approximately 35 minutes, or until a toothpick inserted into the center comes out clean or with a few moist crumbs (but no wet batter).
- The cake should be golden brown on top and slightly pulled away from the edges of the pan.
- Remove from the oven and allow to cool in the pan for about 10 minutes, then transfer to a wire rack to cool completely.
- Once cooled, dust with powdered sugar if desired.
- Slice and serve at room temperature.
Nutritional Information and Timing
Preparation Time: 15 minutes
Baking Time: 35 minutes
Cooling Time: 20 minutes
Total Time: 1 hour 10 minutes
Servings: 9-12 slices
Per Serving (1/12 of cake):
- Calories: Approximately 180 kcal
- Protein: 4g
- Carbohydrates: 27g
- Fiber: 1g
- Fat: 7g
- Sugar: 13g
- Sodium: 100mg
Cooking Tips and Tricks
- Room Temperature Ingredients: For the best texture, ensure your eggs are at room temperature before starting. Cold eggs won’t incorporate as much air when beaten with sugar.
- Berry Selection: This recipe works with virtually any berries – blueberries, raspberries, blackberries, strawberries (chopped), or a mix. Each will lend its unique flavor profile to the cake.
- Frozen vs. Fresh: While fresh berries are wonderful in season, frozen berries actually hold their shape better during baking. If using fresh berries, consider freezing them for 30 minutes before adding to the batter.
- Oil Choice: Use a neutral-tasting oil to let the vanilla and berry flavors shine. Coconut oil (melted) can be used for a subtle coconut undertone that pairs beautifully with berries.
- Testing Doneness: The toothpick test can be tricky with berry cakes as berry juice might make the toothpick look wet. Insert it in an area between berries for the most accurate test.
- Preventing Sink: Tossing berries in cornstarch not only prevents excess moisture but also helps keep them from sinking to the bottom of the cake.
- Storage Tip: This cake actually improves in flavor after a day, as the moisture from the berries permeates the cake more thoroughly.
Variations and Substitutions
- Lemon-Berry Version: Add the zest of one lemon to the batter for a bright, citrusy note that complements the berries beautifully.
- Almond Flour Boost: Replace 50g of the wheat flour with almond flour for a more pronounced almond flavor and slightly denser, moister texture.
- Dairy-Free Option: Substitute the milk with almond milk, oat milk, or any plant-based alternative you prefer.
- Gluten-Free Adaptation: Replace the wheat flour with a gluten-free all-purpose flour blend. Add ¼ teaspoon xanthan gum if your blend doesn’t already include it.
- Spice Infusion: Add ½ teaspoon of cinnamon or cardamom to the batter for a warm, spiced variation that works especially well with cherries or blackberries.
- Yogurt Substitution: Replace half the milk with plain yogurt or sour cream for a slightly tangier flavor and even more tender crumb.
- Nut Variations: Substitute the almond flakes with chopped pistachios, walnuts, or pecans for different flavor profiles and textures.
Common FAQs
Can I make this cake ahead of time?
Yes, this cake actually tastes even better the day after baking as the flavors have time to meld. Store it covered at room temperature for up to 2 days, or refrigerate for up to 5 days.
Why did my berries sink to the bottom of the cake?
Berries can sink if they’re too heavy for the batter. Make sure to coat them in cornstarch, which helps absorb excess moisture and creates a slight barrier. Also, using a portion of the batter first, then adding berries, followed by more batter, helps prevent sinking.
Can I freeze this cake?
Yes, this cake freezes well. Wrap it tightly in plastic wrap and then aluminum foil, or place in an airtight container. Freeze for up to 3 months. Thaw overnight in the refrigerator or for several hours at room temperature before serving.
My cake cracked on top. Did I do something wrong?
A cracked top is completely normal for this type of cake and adds to its rustic charm! It happens when the outside of the cake sets before the inside is fully baked. The crack allows steam to escape and is often a sign of a moist, tender interior.
Can I double the recipe for a larger crowd?
Yes, you can double the recipe and bake it in a larger pan (approximately 13×9 inches). The baking time will need to be adjusted—start checking for doneness at the 40-minute mark and continue checking every 5 minutes until a toothpick comes out clean.
Storage and Make-Ahead Tips
- Room Temperature Storage: The cake can be stored in an airtight container at room temperature for up to 2 days.
- Refrigeration: For longer storage, refrigerate the cake in an airtight container for up to 5 days. Let it come to room temperature before serving for the best flavor and texture.
- Freezing Instructions: Wrap individual slices or the entire cake (uncut) tightly in plastic wrap and then aluminum foil. Freeze for up to 3 months. Thaw overnight in the refrigerator.
- Reheating: To refresh slightly stale cake, warm individual slices in the microwave for 10-15 seconds, or place the entire cake in a 300°F (150°C) oven for 5-10 minutes.
- Make-Ahead Components: The dry ingredients can be mixed ahead of time and stored in an airtight container at room temperature for up to a month. Just add the wet ingredients when you’re ready to bake.
- Sugerencia de presentación: Para un postre especial, sirva ligeramente tibio con una bola de helado de vainilla o una cucharada de crema batida ligeramente endulzada.
- Regalos: Este pastel es ideal para llevar, así que es perfecto para regalar. Una vez frío, envuélvalo en papel de horno y luego en papel aluminio, o colóquelo en un molde decorativo.
Este pastel de almendras y frutos rojos es el equilibrio perfecto entre simplicidad y elegancia. Gracias a su rápida preparación y su maravillosa adaptabilidad a diferentes frutos rojos y sabores, sin duda se convertirá en un clásico en tu repertorio de repostería. Ya sea como un aperitivo informal con café, como postre en una cena o para llevar a comidas compartidas y picnics, este versátil pastel sin duda encantará a todos y saciará los antojos dulces con su tierna textura y sus vibrantes sabores frutales.