Introducción
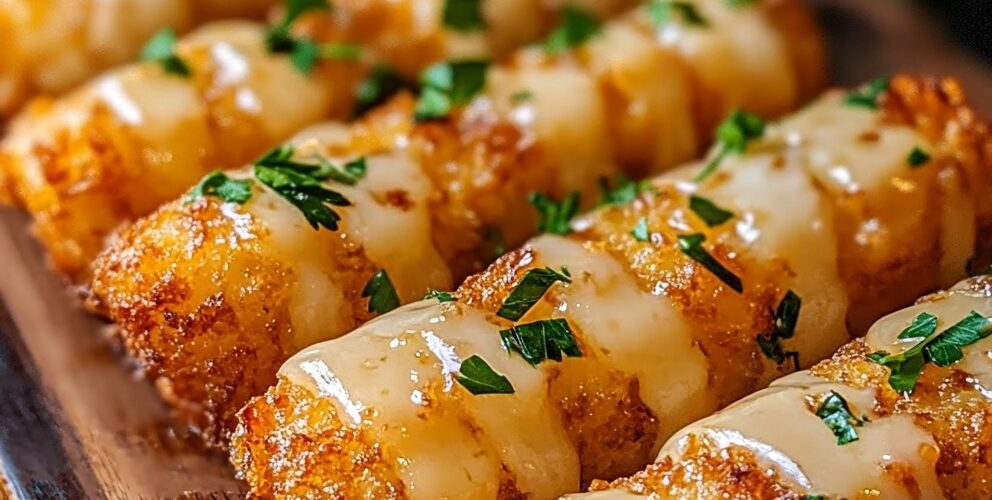
Hay algo irresistiblemente reconfortante en la combinación de papas y queso. Estos Palitos de Papa con Queso llevan esta apreciada combinación a un nuevo nivel, con un exterior dorado y crujiente que da paso a un centro cremoso y quesoso. Perfectos como aperitivo, botana para fiestas o una guarnición indulgente, estos deliciosos bocaditos desaparecerán rápidamente de cualquier mesa. El contraste entre la cobertura crujiente y el relleno suave y sabroso crea una obra maestra de texturas que hará que todos quieran repetir. Profundicemos en esta receta que encanta a todos y que transforma ingredientes sencillos en algo extraordinario.
Ingredientes
Para la mezcla de papa y queso:
- 3 patatas medianas (unos 600 g/1,3 lbs), peladas y cortadas en cubos
- 200 g (7 oz/2 tazas) de queso rallado (cheddar, mozzarella o una mezcla funcionan bien)
- 1 cucharadita (3 g) de ajo en polvo
- 1 cucharadita (2 g) de pimentón ahumado
- Sal y pimienta al gusto
Para el empanizado:
- 1 taza (125 g) de harina para todo uso
- 2 huevos grandes
- 1 taza (100 g) de pan rallado (el panko funciona especialmente bien)
Para freír y decorar:
- Aceite vegetal para freír (aproximadamente 2 tazas/475 ml)
- Perejil fresco picado (aproximadamente 2 cucharadas/8 g)
Instrucciones
Preparación de la mezcla de papas
- Hervir las papas : Llene una olla grande con agua y llévela a ebullición. Añada una pizca de sal y las papas cortadas en cubos. Cocine hasta que estén tiernas, aproximadamente de 15 a 20 minutos. Escurra bien y transfiera a un tazón grande.
- Machacar las papas : Mientras las papas aún estén calientes, machacarlas hasta que estén suaves. Dejar enfriar un poco durante 5 minutos.
- Combine los ingredientes : Añada el queso rallado, el ajo en polvo, el pimentón ahumado, la sal y la pimienta al puré de papas. Mezcle bien hasta que todos los ingredientes estén bien incorporados. La mezcla debe estar lo suficientemente firme como para mantener su forma al moldearla.
- Enfríe la mezcla : para facilitar su manejo, cubra el recipiente y refrigere la mezcla durante 30 minutos para que se endurezca.
Dar forma y empanar
- Dale forma a los palitos : Con las manos ligeramente húmedas (para evitar que se peguen), toma unas 2 cucharadas de la mezcla y dale forma de palito de aproximadamente 7,5 a 10 cm (3 a 4 pulgadas) de largo y 2,5 cm (1 pulgada) de grosor. Colócalo en una bandeja forrada con papel vegetal. Repite con el resto de la mezcla.
- Prepara las estaciones de empanizado : Coloca tres platos hondos en fila. Llena el primero con harina sazonada con una pizca de sal y pimienta. Bate los huevos en el segundo plato. Coloca el pan rallado en el tercero.
- Bread the Potato Sticks: Working with one stick at a time, roll it first in the flour, ensuring it’s completely coated. Shake off any excess. Next, dip it in the beaten eggs, allowing any excess to drip off. Finally, roll it in the breadcrumbs, pressing gently to ensure they adhere. Place the breaded stick back on the parchment-lined tray. Repeat with all remaining potato sticks.
- Chill Before Frying: For best results, place the breaded sticks in the refrigerator for 15-20 minutes. This helps the breading adhere better during frying.
Frying and Serving
- Heat the Oil: In a large, deep skillet or pot, heat approximately ½ inch (1.3 cm) of vegetable oil to 350°F (175°C). If you don’t have a thermometer, you can test the oil by dropping in a few breadcrumbs—they should sizzle immediately and float to the top.
- Fry in Batches: Carefully place 4-5 potato cheese sticks in the hot oil, being careful not to overcrowd the pan. Fry until golden brown and crispy, about 3-4 minutes per side, turning once with tongs or a slotted spoon.
- Drain and Cool: Remove the fried sticks and place them on a paper towel-lined plate to absorb excess oil. Allow to cool slightly for 2 minutes.
- Garnish and Serve: Transfer the potato cheese sticks to a serving platter, sprinkle with freshly chopped parsley, and serve immediately while still warm and gooey inside.
Nutritional Information and Timing
Prep Time: 30 minutes Chill Time: 45 minutes Cook Time: 20 minutes Total Time: 1 hour 35 minutes Servings: 4-6 (makes approximately 12-15 sticks)
Nutritional Information (per serving, based on 6 servings):
- Calories: 340
- Protein: 12g
- Carbohydrates: 35g
- Fat: 17g
- Fiber: 2g
- Sodium: 380mg
Cooking Tips and Tricks
- Choose the Right Potato: Starchy potatoes like Russets or Yukon Golds work best for this recipe as they yield a fluffier texture when mashed.
- Cheese Selection: While a sharp cheddar provides excellent flavor, mixing in some mozzarella creates that Instagram-worthy cheese pull when the sticks are broken apart.
- Double Coating: For an extra crispy exterior, you can repeat the breading process (flour-egg-breadcrumbs) a second time after the first coating.
- Oil Temperature: Maintaining the correct oil temperature is crucial. Too hot, and the outside will burn before the inside warms; too cool, and the sticks will absorb excess oil and become greasy.
- Seasoning the Breadcrumbs: For additional flavor, mix herbs or spices into your breadcrumbs – Italian seasoning, cayenne pepper, or onion powder all work wonderfully.
- Baking Option: If you prefer to avoid frying, these sticks can be baked. Arrange them on a greased baking sheet, spray or brush lightly with oil, and bake at 425°F (220°C) for about; 25 minutes, turning halfway through.
- Test Batch: Always fry one stick first to check if your oil temperature is right and if the seasoning level in the mixture is to your taste.
Variations and Substitutions
Cheese Variations:
- Try different cheese combinations like pepper jack for heat, gouda for smokiness, or blue cheese for a tangy twist.
- For a Mexican-inspired version, use a blend of Monterey Jack and cheddar with a teaspoon of cumin added to the mixture.
Dietary Adaptations:
- Gluten-Free: Substitute the all-purpose flour with rice flour or a gluten-free flour blend, and use gluten-free breadcrumbs.
- Lower Carb: Replace half the potato with cauliflower that has been steamed and very well drained.
Flavor Enhancements:
- Add finely chopped herbs like chives, dill, or rosemary to the potato mixture.
- Mix in crumbled bacon or finely diced jalapeños for a flavor boost.
- Incorporate a tablespoon of Dijon mustard into the potato mixture for tanginess.
Shape Variations:
- Form the mixture into balls for potato cheese bites.
- Shape into patties for potato cheese croquettes that can be served as sliders.
Coating Alternatives:
- Use crushed cornflakes or potato chips instead of breadcrumbs for a unique crunch.
- Add a tablespoon of grated Parmesan to the breadcrumbs for an extra flavor dimension.
Common FAQs
Why are my potato cheese sticks falling apart during frying?
This typically happens when the potato mixture isn’t firm enough. Make sure to drain the potatoes well after boiling, and don’t skip the chilling step before shaping and after breading. If the mixture is still too soft, you can add a tablespoon of flour to help bind it.
Can I make these potato cheese sticks ahead of time?
Yes! You can prepare and bread the sticks up to 24 hours in advance. Keep them covered in the refrigerator until ready to fry. You can also freeze the breaded (but unfried) sticks for up to 1 month.
What dipping sauces pair well with these potato cheese sticks?
These sticks are delicious with a variety of dips including marinara sauce, sriracha mayo, ranch dressing, garlic aioli, or a simple sour cream and chive dip.
How do I know when the oil is at the right temperature without a thermometer?
Drop a small piece of bread into the oil. If it browns in about 60 seconds, the oil is ready. If it browns too quickly, the oil is too hot; if it takes longer than a minute, the oil needs more heating.
Can I use instant mashed potatoes for this recipe?
While fresh potatoes provide the best texture and flavor, you can use instant mashed potatoes in a pinch. Prepare according to package directions, but use slightly less liquid than called for to ensure a firmer consistency.
Storage and Make-Ahead Tips
Almacenamiento en el refrigerador: Los palitos de queso de papa cocidos se pueden guardar en un recipiente hermético en el refrigerador hasta por 3 días. Perderán algo de su textura crujiente, pero seguirán estando deliciosos.
Almacenamiento en congelador:
- Crudos : Los palitos empanizados, pero sin freír, se pueden congelar en una sola capa sobre una bandeja para hornear hasta que estén sólidos y luego transferirlos a una bolsa para congelar. Se pueden conservar hasta un mes. Fríalos directamente congelados, añadiendo de 1 a 2 minutos al tiempo de cocción.
- Cocido : Los palitos completamente cocidos se pueden congelar hasta por dos semanas. Descongélelos en el refrigerador antes de recalentarlos.
Recalentamiento:
- Método de horno (preferido) : recalentar en un horno a 190 °C (375 °F) durante 7 a 10 minutos hasta que esté caliente y crujiente.
- Freidora de aire : recalentar a 350 °F (175 °C) durante 3-4 minutos para obtener resultados perfectamente crujientes.
- Microondas : Usar solo como último recurso, ya que los palitos se humedecerán. Calentar al 50 % de potencia durante 30 segundos hasta que estén apenas tibios.
Estrategias de preparación con antelación:
- Prepare la mezcla de papa hasta con 2 días de anticipación y guárdela en el refrigerador.
- Completar el proceso de empanizado hasta 24 horas antes de cocinar y guardar tapado en el refrigerador.
- Si va a preparar una tanda grande para una fiesta, organice una línea de montaje: una persona le da forma, otra maneja el empanado y una tercera supervisa la fritura.
Estos palitos de papa con queso son más que un simple refrigerio: son un capricho versátil que realzará cualquier ocasión, desde noches de juegos informales hasta elegantes cócteles. Con su combinación perfecta de crujiente exterior e interior cremoso y quesoso, sin duda se convertirán en un clásico de tu recetario. ¿Y lo mejor? Son fácilmente personalizables para adaptarse a tus gustos y necesidades dietéticas. Sírvelos calientes, observa cómo desaparecen y prepárate para las inevitables repeticiones.