Introducción
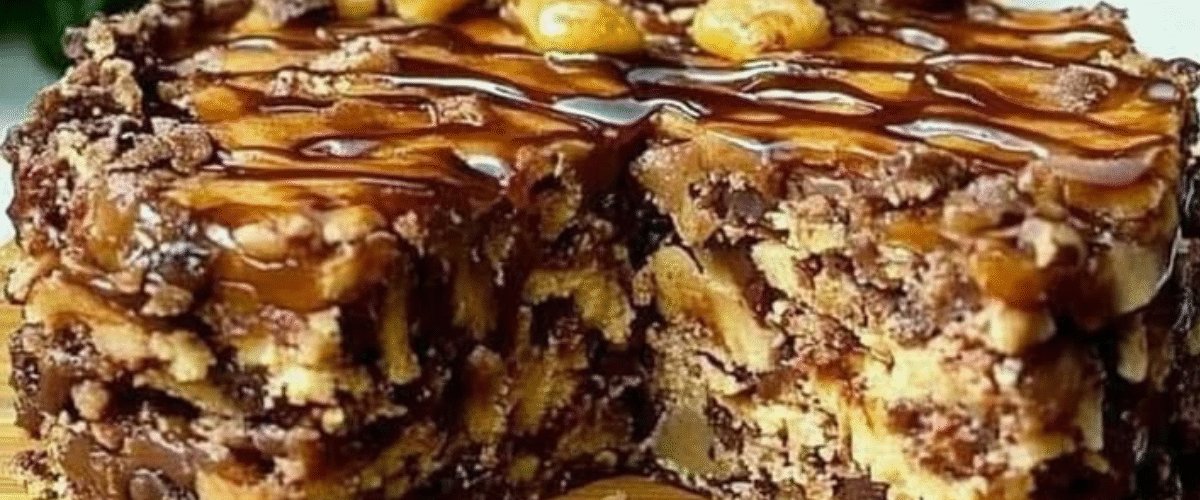
¡Consiéntete con el postre perfecto con este espectacular pastel de galletas de chocolate y caramelo sin horno! Este impresionante postre combina los ricos sabores del chocolate y el caramelo con el crujiente sabor de las galletas y las nueces para un irresistible contraste de texturas en cada bocado. La belleza de este pastel no solo reside en su exquisita apariencia y sabor, sino también en su simplicidad: no requiere horneado y requiere un tiempo de preparación mínimo. Perfecto para cuando necesitas un postre impresionante pero no quieres encender el horno, este pastel refrigerado tiene capas de galletas cubiertas de chocolate, caramelo dulce y nueces crujientes que se combinan en un dulce rebanable que sabe como si hubiera tardado horas en prepararse. Ya sea que recibas invitados, lleves un plato a una comida compartida o simplemente te des un capricho especial, esta maravilla sin horno se convertirá rápidamente en tu receta favorita para una satisfacción sin complicaciones.
Ingredientes
Para la base de galleta:
- 400 g (14 oz) de galletas digestivas o galletas graham
- 200 g (7 oz) de mantequilla sin sal
- 200 g (1 taza) de chispas de chocolate negro
- 100 g (1/2 taza) de chispas de chocolate con leche
- 3 cucharadas de cacao en polvo
- 100 g (1/2 taza) de azúcar granulada
- 60 ml (1/4 taza) de leche
Para la capa de caramelo:
- 400 g (14 oz) de salsa de caramelo o dulce de leche comprado en la tienda
- 1/2 cucharadita de sal marina (opcional, para sabor a caramelo salado)
Para la cobertura:
- 150 g (1 taza) de frutos secos mixtos (nueces, avellanas, cacahuetes)
- 100 g (1/2 taza) de chispas de caramelo o chispas de caramelo
- 4 cucharadas de salsa de caramelo (para rociar)
- 50 g (1/4 taza) de chocolate negro derretido (para rociar)
Instrucciones
- Prepare el molde: cubra un molde para pastel o fuente cuadrada de 20 cm (8 pulgadas) con papel pergamino, dejando un poco de papel sobrante para poder retirarlo fácilmente después.
- Tritura las galletas: Coloca las galletas digestivas o las galletas graham en una bolsa grande con cierre hermético y tritúralas con un rodillo hasta obtener una mezcla de migas finas y trozos pequeños. También puedes triturarlas en un procesador de alimentos, procurando que las migas no queden demasiado finas; es preferible que tengan algo de textura.
- Prepare la mezcla de chocolate: en una cacerola grande a fuego lento, derrita la mantequilla, las dos chispas de chocolate, el cacao en polvo, el azúcar y la leche, revolviendo constantemente hasta que quede una mezcla suave y completamente combinada.
- Mezclar con las galletas: retirar del fuego e incorporar las galletas trituradas, asegurándose de que todos los trozos estén bien cubiertos con la mezcla de chocolate.
- Crea la primera capa: transfiere aproximadamente 2/3 de la mezcla de galletas de chocolate al molde preparado, presionando firme y uniformemente con el dorso de una cuchara o un vaso de fondo plano para crear una base compacta.
- Add the caramel layer: If using store-bought caramel sauce, warm it slightly for easier spreading. Pour and spread the caramel evenly over the biscuit layer. If adding salt for a salted caramel flavor, sprinkle it over the caramel now.
- Top with remaining mixture: Crumble the remaining 1/3 of the chocolate biscuit mixture over the caramel layer, creating a rougher, more textured top surface.
- Add nuts and chips: Scatter the mixed nuts and caramel chips over the top, gently pressing them into the surface.
- Drizzle with toppings: Warm the additional caramel sauce slightly and drizzle over the top of the cake. Follow with drizzles of melted dark chocolate for a decorative finish.
- Chill to set: Refrigerate the cake for at least 4 hours, preferably overnight, until completely set and firm.
- Serve: Remove from the refrigerator 15-20 minutes before serving to take the chill off. Lift out using the parchment paper overhang, cut into squares, and enjoy!
Nutritional Information and Timing
Prep Time: 25 minutes Chilling Time: 4 hours minimum (overnight preferred) Total Time: 4 hours 25 minutes (plus overnight chilling)
Servings: 16 squares
Per Serving:
- Calories: 450
- Fat: 27g
- Saturated Fat: 13g
- Carbohydrates: 48g
- Sugar: 35g
- Protein: 5g
- Fiber: 2g
- Sodium: 250mg
Cooking Tips and Tricks
- Biscuit selection matters: While digestive biscuits or graham crackers are traditional, you can experiment with other crisp cookies like shortbread, Biscoff, or even chocolate sandwich cookies (remove cream filling first).
- Texture balance: For the perfect texture, aim for a mix of fine crumbs and small chunks when crushing your biscuits. This creates both structure and satisfying texture.
- Chocolate melting technique: When melting the chocolate mixture, use low heat and stir constantly to prevent scorching. If you have a double boiler, even better.
- Easy release: The parchment paper sling is crucial for easy removal. Make sure it extends up all sides of the pan with some overhang to use as handles.
- Caramel consistency: If your store-bought caramel is too thick to spread, warm it slightly in the microwave (10-15 seconds), or stir in 1-2 tablespoons of heavy cream to thin it.
- Neat cutting: For clean slices, dip your knife in hot water and wipe dry between cuts. This melts through the chocolate slightly for smoother edges.
- Proper setting: Resist the temptation to cut the cake too soon. Proper chilling is essential for the layers to set and hold together when sliced.
- Temperature tip: Taking the cake out of the refrigerator 15-20 minutes before serving allows flavors to bloom and textures to soften slightly for the best eating experience.
Variations and Substitutions
- Cookie variations: Try using chocolate digestives, gingersnaps, Biscoff cookies, or Oreos (with filling removed) for different flavor profiles.
- Chocolate options: Experiment with different chocolate combinations like all dark for intensity, all milk for sweetness, or add white chocolate for visual contrast.
- Nut-free version: Replace nuts with additional biscuit pieces, mini marshmallows, or dried fruit for a nut-free alternative.
- Boozy twist: Add 2-3 tablespoons of Baileys, Kahlúa, or rum to the chocolate mixture for an adult version.
- Flavor enhancements: Add 1 teaspoon of instant coffee powder to the chocolate mixture for a mocha flavor, or 1/2 teaspoon of cinnamon for warmth.
- Fruit additions: Layer in dried cranberries, cherries, or chopped dried apricots for fruity bursts of flavor.
- Vegan adaptation: Use dairy-free chocolate, plant-based butter, and coconut condensed milk caramel for a vegan version.
- Layered approach: Create more distinct layers by adding a middle layer of white chocolate ganache or peanut butter between the biscuit and caramel layers.
Common FAQs
Q: Can I make this cake ahead of time?
A: Absolutely! This cake actually improves with time as the flavors meld together. You can make it up to 3 days in advance and keep refrigerated.
Q: My cake didn’t set properly. What went wrong?
A: The most common cause is not chilling it long enough. Make sure to give it at least 4 hours, preferably overnight. Another possibility is that the chocolate mixture was too runny—ensure you use the correct proportions of ingredients.
Q: Can I freeze this cake?
A: Yes! This cake freezes beautifully. Wrap it well in plastic wrap and then aluminum foil, and freeze for up to 3 months. Thaw overnight in the refrigerator before serving.
Q: The caramel layer is oozing out when I cut the cake. How can I prevent this?
A: Make sure your caramel layer is completely set before cutting. Additionally, using a slightly thicker caramel or adding 1 tablespoon of butter to your caramel will help it set firmer.
Q: Can I use homemade caramel instead of store-bought?
A: Definitely! If making homemade caramel, cook it to a slightly thicker consistency than you would for a sauce, so it sets properly in the cake.
Storage and Make-Ahead Tips
Refrigerator:
- Store in an airtight container in the refrigerator for up to 1 week.
- Keep layers separated with parchment paper if stacking slices.
- The flavor actually improves after 24-48 hours as the biscuits soften and the flavors meld.
Freezer:
- Este pastel se congela excepcionalmente bien hasta por 3 meses.
- Córtelo en porciones individuales antes de congelarlo para descongelarlo fácilmente.
- Envuelva cada pieza firmemente en film transparente y luego colóquela en un recipiente o bolsa aptos para congelador.
- Descongelar durante la noche en el refrigerador o a temperatura ambiente durante 2-3 horas.
Opciones para preparar con antelación:
- Preparar todo el pastel hasta 3 días antes de servir y conservar refrigerado.
- Para un evento, puedes hacer la base y las capas de caramelo, refrigerar y agregar los toppings y lloviznas decorativas el día de servir.
Sugerencias de presentación:
- Para una mesa de postres, córtelo en trozos más pequeños.
- Sirva con una bola de helado de vainilla para un postre indulgente.
- Combínalo con un café o un vaso de leche para disfrutar del momento perfecto de la tarde.
- Para ocasiones especiales, decora con polvo dorado o brillantina comestible antes de que se asienten las gotas de chocolate y caramelo.
Consejos de transporte:
- Si lo vas a transportar a un evento, mantén el pastel en el molde hasta que llegues.
- Transporte en una hielera con bolsas de hielo si viaja más de 30 minutos.
- Rocíe con aderezos después de la llegada para lograr una apariencia más fresca.
Este pastel de galleta de chocolate y caramelo sin horno es la solución perfecta para un postre espectacular sin las complicaciones de hornear. Su espectacular apariencia contrasta con la simplicidad de su preparación, mientras que la combinación de texturas y sabores crea un capricho verdaderamente memorable. Ya sea para una ocasión especial o para un capricho diario, este versátil postre se convertirá en uno de tus favoritos. Su preparación con antelación y su excelente capacidad de almacenamiento lo hacen ideal para anfitriones ocupados o para quienes buscan minimizar la preparación del día y, al mismo tiempo, lograr un resultado impactante.