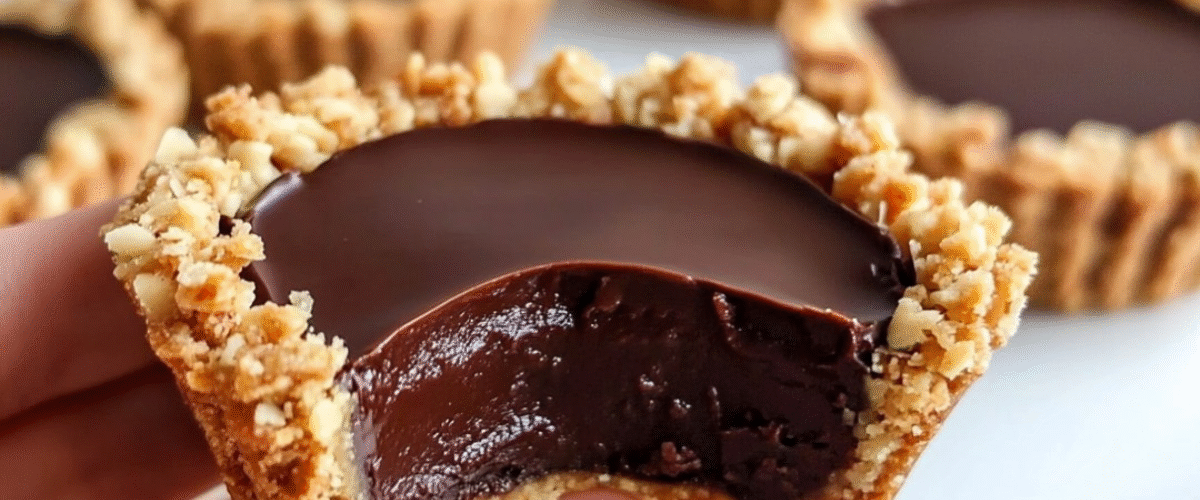
Este increíble postre de chocolate sin horno revolucionará tu forma de preparar dulces caseros. Con solo seis ingredientes sencillos, puedes crear elegantes tazas de chocolate individuales con una crujiente base de galleta y almendra y un suave relleno de ganache. Ideal para cuando necesitas un postre espectacular sin usar el horno, esta receta ofrece resultados de panadería en poco tiempo y con el máximo sabor.
Por qué este postre de chocolate sin horno es perfecto
Los postres tradicionales de chocolate suelen requerir largos tiempos de horneado, técnicas complejas o ingredientes difíciles de encontrar, como la gelatina. Esta innovadora receta elimina todas esas complicaciones y ofrece resultados superiores. La combinación de galletas trituradas y almendras crea una corteza naturalmente aglutinante que mantiene su forma a la perfección, mientras que el rico ganache de chocolate proporciona un relleno irresistible. Al no contener harina, es naturalmente apto para gluten si se utilizan las galletas adecuadas.
Ingredientes
Para la corteza de galletas y almendras:
- 200 g (7,05 oz) de galletas digestivas o galletas graham
- 80 g (2,79 oz) de almendras crudas
- 100 g (3,53 oz) de mantequilla sin sal, derretida
Para el ganache de chocolate:
- 150 g (5,29 oz) de chocolate negro (60-70 % cacao), picado
- 90 g (3,14 oz) de crema espesa
- 7 g (0,25 oz) de mantequilla sin sal
Equipo necesario:
- Procesador de alimentos o licuadora
- Molde para muffins o moldes individuales para postres
- Cacerola pequeña
- Cuencos para mezclar
Instrucciones paso a paso
Preparación de la base de galleta y almendras
Paso 1: Procesar las almendras. Colocar las almendras crudas en un procesador de alimentos y procesar hasta que estén picadas gruesas, pero no en polvo. Se busca una mezcla de trozos finos y trozos ligeramente más grandes para darle textura. Las almendras deben conservar su textura firmeza, pero ser lo suficientemente pequeñas como para que se integren bien con las galletas.
Paso 2: Agregar las galletas. Añada las galletas al procesador de alimentos junto con las almendras picadas. Bata a intervalos cortos hasta que la mezcla parezca pan rallado grueso con algunos trozos más grandes. La textura debe ser variada, con migas finas y pequeños trozos que le darán una textura interesante.
Paso 3: Incorporar la mantequilla. Derretir la mantequilla y dejar enfriar un poco para evitar que se derrita por completo. Con el procesador de alimentos en marcha, añadir lentamente la mantequilla derretida hasta que la mezcla empiece a grumos al presionarla. La mezcla debe mantenerse unida al presionarla, pero sin quedar demasiado húmeda.
Paso 4: Comprueba la consistencia. Toma un puñado de la mezcla y apriétala bien. Debe formar una bola compacta sin desmoronarse. Si está demasiado seca, añade un poco más de mantequilla derretida, una cucharadita a la vez. Si está demasiado húmeda, añade unas cuantas galletas trituradas más.
Formación de las copas de postre
Step 5: Prepare the Molds Line a muffin tin with paper liners or lightly grease individual dessert molds. You can also use silicone molds for easier removal. This recipe should make 6-8 individual servings depending on the size of your molds.
Step 6: Shape the Bases Divide the cookie-almond mixture evenly among the prepared molds. Using your fingers or the back of a spoon, press the mixture firmly into the bottom of each mold, creating a compact base layer approximately 1cm (½ inch) thick.
Step 7: Create the Walls Continue pressing the mixture up the sides of each mold to create cup-shaped containers. The walls should be sturdy enough to hold the ganache filling. Press firmly to ensure the structure won’t collapse when filled.
Step 8: Chill the Bases Place the formed bases in the refrigerator while you prepare the chocolate ganache. This initial chilling helps the bases set and maintain their shape when the warm ganache is added.
Preparing the Chocolate Ganache
Step 9: Heat the Cream Pour the cream into a small saucepan and heat over medium-low heat until it just begins to simmer. Small bubbles should form around the edges, but don’t let it come to a full boil as this can cause the ganache to break.
Step 10: Prepare the Chocolate While the cream heats, chop the chocolate into small, uniform pieces for even melting. Place the chopped chocolate in a heatproof bowl, ensuring the bowl is completely dry to prevent the chocolate from seizing.
Step 11: Create the Ganache Pour the hot cream over the chopped chocolate and let it sit for 2-3 minutes without stirring. This allows the heat to gently melt the chocolate. After the resting period, stir gently from the center outward until the mixture becomes smooth and glossy.
Step 12: Finish the Ganache Add the small amount of butter to the ganache and stir until completely incorporated. The butter adds extra richness and gives the ganache a beautiful shine. The finished ganache should be smooth, glossy, and coat the back of a spoon.
Final Assembly
Step 13: Fill the Cups Remove the chilled cookie bases from the refrigerator. Carefully spoon or pour the warm ganache into each cup, filling them nearly to the top. The contrast between the cool, set base and warm ganache creates the perfect texture combination.
Step 14: Level and Smooth Gently tap the molds on the counter to level the ganache and eliminate any air bubbles. Use a small offset spatula or the back of a spoon to smooth the surface if needed.
Step 15: Final Chill Return the filled dessert cups to the refrigerator and chill for at least 2 hours, or until the ganache is completely set. For firmer results, chill for 4 hours or overnight.
Nutritional Information and Timing
Preparation Time: 20 minutes Chilling Time: 2-4 hours Total Time: 2 hours 20 minutes to 4 hours 20 minutes Serves: 6-8 people Calories per serving: Approximately 385 calories
Nutritional Benefits: Each serving provides healthy fats from almonds and dark chocolate, along with antioxidants from cocoa. The almonds contribute protein, vitamin E, and magnesium, while dark chocolate offers flavonoids that support heart health.
Recipe Variations and Substitutions
Gluten-Free Version: Use certified gluten-free cookies or substitute with crushed gluten-free oats mixed with a tablespoon of cocoa powder for binding.
Nut-Free Alternative: Replace almonds with toasted seeds like sunflower or pumpkin seeds, or use additional cookies for a simpler base.
Flavor Variations: Add orange zest to the ganache for chocolate-orange cups, or incorporate a tablespoon of liqueur like rum, coffee liqueur, or amaretto for adult versions.
Different Chocolates: Experiment with milk chocolate for sweeter results or white chocolate for an elegant variation, adjusting cream quantities as needed for proper consistency.
Vegan Adaptation: Use vegan butter and coconut cream instead of dairy cream, ensuring your chocolate and cookies are also vegan-friendly.
Serving and Presentation Tips
These elegant dessert cups can be served directly in their molds for casual dining or carefully removed for more formal presentation. Garnish with fresh berries, a sprinkle of sea salt, chopped nuts, or a dollop of whipped cream. For special occasions, dust with edible gold powder or drizzle with contrasting chocolate.
Storage and Make-Ahead Benefits
These desserts are perfect for entertaining as they can be made 1-2 days in advance. Store covered in the refrigerator and bring to room temperature for 10-15 minutes before serving for optimal texture. They can also be frozen for up to one month, though the texture may be slightly different when thawed.
Professional Tips for Success
The key to perfect results lies in achieving the right consistency for both components. The cookie base should be moist enough to hold together but not so wet that it becomes soggy. The ganache should be smooth and glossy without any graininess, which can occur if the cream is too hot or if water gets into the chocolate.
Frequently Asked Questions
Can I use different types of cookies for the base? Absolutely! Graham crackers, digestive biscuits, vanilla wafers, or even chocolate cookies work well. Each will create a slightly different flavor profile. Avoid cookies that are too sweet if using sweet chocolate for the ganache.
¿Qué pasa si mi ganache se vuelve granulado o se separa? El ganache granulado suele deberse al sobrecalentamiento o a la contaminación con agua. Para solucionarlo, incorpore gradualmente una cucharada de crema tibia batiendo hasta que quede suave. Para evitarlo, utilice utensilios secos y no sobrecaliente la crema.
¿Cómo sé si los postres están bien cuajados? El ganache debe estar firme al tacto y no dejar marcas al presionarlo ligeramente. La superficie debe verse mate en lugar de brillante, lo que indica que está completamente cuajado.
¿Puedo preparar porciones más grandes o más pequeñas? Sí, ajuste el tamaño del molde según sus necesidades. Las porciones más grandes pueden requerir más tiempo de enfriamiento, mientras que las más pequeñas cuajan más rápido. La receta se adapta bien a diferentes tamaños de porciones.
¿Cuál es la mejor manera de desmoldar los postres? Si usas capacillos de papel, simplemente despégalos. En el caso de moldes rígidos, sumerge brevemente la base en agua tibia durante 5 a 10 segundos y luego dales la vuelta sobre un plato. Los moldes de silicona suelen desmoldarse fácilmente con una ligera presión.
Este extraordinario postre de chocolate sin horno demuestra que los resultados impresionantes no siempre requieren técnicas complicadas ni largos tiempos de preparación. La combinación de una base crujiente con sabor a nuez y un ganache de chocolate suave y sedoso crea un contraste de texturas sofisticado y delicioso. Ya sea para recibir invitados o simplemente para darse un capricho, estas elegantes tazas de chocolate ofrecen resultados de panadería con la simplicidad de una cocina casera.