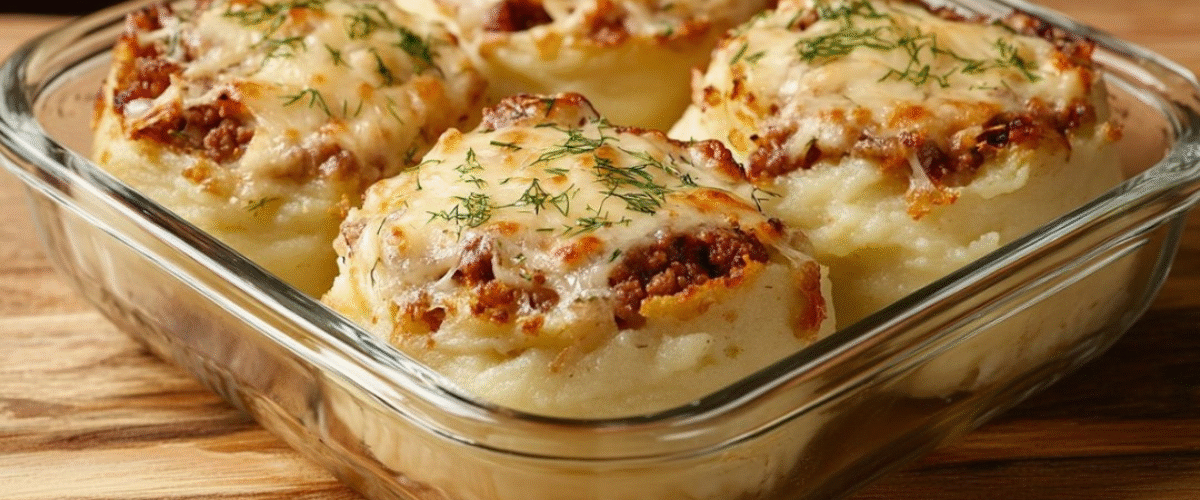
Estos nidos de papa rellenos de queso y dorados son la comida reconfortante definitiva, ya que combinan un cremoso puré de papa con un rico y sabroso relleno de carne molida. Cada nido es una porción individual perfecta, visualmente impactante y muy satisfactoria. Esta receta transforma ingredientes sencillos en un plato elegante que se siente como un cálido abrazo en el plato, ideal para cenas familiares u ocasiones especiales.
Ingredientes
Para los nidos de papa:
- 5 patatas medianas (aproximadamente 750 g/1,65 lbs)
- 60 g (4 cucharadas) de mantequilla
- 1 huevo grande
- 1 manojo pequeño de perejil fresco, finamente picado
- 120 g (4 oz) de queso parmesano rallado
- 1 cucharadita de sal (para agua hirviendo)
- Aceite de oliva para engrasar
Para el relleno de carne:
- 450 g (1 lb) de carne molida
- 1 cebolla mediana, finamente picada
- 1 zanahoria mediana, finamente picada
- 1 pimiento rojo, finamente picado
- 1 tomate mediano, finamente picado
- 2-3 cucharaditas de pasta de tomate
- 2 dientes de ajo rallados
- 1 cucharadita de sal
- 1 cucharadita de pimienta negra
- 1 cucharadita de pimentón
- 2-3 cucharadas de aceite de oliva
Para ensamblar y hornear:
- 60 g (2 oz) de queso cheddar rallado
- Tomates cherry para decorar
- Eneldo fresco o perejil para decorar.
Instrucciones paso a paso
Preparando las patatas
Llene una olla grande con agua y añada una cucharadita de sal, removiendo suavemente para que se disuelva. Lave y pele las papas, luego córtelas en cubos medianos y uniformes de aproximadamente 3 cm (1¼ pulgadas). Los trozos uniformes garantizan una cocción uniforme y una textura suave.
Añade las papas cortadas en cubos al agua con sal y ponlas a hervir a fuego medio-alto. Cocina durante 20-30 minutos, o hasta que las papas estén tiernas y se puedan pinchar fácilmente con un tenedor. El tiempo de cocción dependerá del tamaño de los cubos y de la variedad de papa utilizada.
Una vez que las papas estén bien cocidas, escúrralas bien con un colador y deje que se evapore el exceso de humedad durante unos minutos. Transfiera las papas calientes a un tazón grande mientras aún estén tibias, ya que esto facilita el puré y resulta más esponjoso.
Creación de la base de puré de papas
Añade la mantequilla a las papas calientes y deja que se derrita por completo. El calor residual de las papas derretirá la mantequilla uniformemente. Añade un huevo a la mezcla, lo que ayudará a ligar el puré y le dará una textura más rica.
Con un machacador de papas o un tenedor grande, machaque las papas hasta obtener una consistencia suave y cremosa, sin grumos. La mezcla debe ser lo suficientemente cohesiva como para mantener su forma al formar los nidos, pero no tan espesa que dificulte trabajarla.
Pica finamente el perejil fresco y añádelo al puré de papas, distribuyéndolo uniformemente. El perejil aporta frescura y un hermoso contraste de color verde al plato.
Preparación del relleno de carne
Heat 2-3 tablespoons of olive oil in a large skillet over medium heat. Add the finely chopped onion and sauté for 2-3 minutes until it becomes soft and translucent. The onion should not brown but rather become sweet and aromatic.
Add the finely diced carrot to the pan and stir well. Cook for another 2-3 minutes until the carrot begins to soften slightly. Follow with the finely chopped red bell pepper, stirring everything together and cooking for an additional minute.
Add the ground beef to the pan, breaking it apart with a spatula as it cooks. The meat should be broken into small, uniform pieces for the best texture in the final dish. Season with salt, black pepper, and paprika, mixing the spices evenly throughout the meat.
Continue cooking the beef mixture for 5-7 minutes, stirring regularly to ensure even browning. The meat should be completely cooked through with no pink remaining.
Completing the Filling
Add the finely diced tomato to the pan along with the tomato paste. The tomato paste adds depth and richness to the filling while helping to bind all the ingredients together. Mix everything well to distribute the tomato paste evenly.
Grate the garlic cloves using a fine grater or microplane, then add to the pan. Fresh grated garlic provides a more intense flavor than minced garlic and distributes more evenly throughout the mixture.
Cover the pan with a lid and allow the mixture to stew for 5-7 minutes. This final cooking step allows all the flavors to meld together and reduces any excess liquid from the tomatoes. Remove from heat and set aside.
Assembling the Potato Nests
Preheat your oven to 180°C (360°F). Grease a baking dish with olive oil, using a pastry brush to ensure even coverage. This prevents sticking and adds flavor to the finished dish.
Lightly oil your hands to prevent the mashed potatoes from sticking, then form the potato mixture into 6-8 evenly sized balls. Each ball should be approximately the size of a tennis ball.
Place each potato ball in the prepared baking dish, spacing them evenly apart. Using your thumb or the back of a spoon, create a deep well in the center of each ball, forming nest-like shapes. The walls should be thick enough to hold the filling without breaking.
Place a small amount of grated Parmesan cheese in the bottom of each well. This creates an extra layer of flavor and helps prevent the filling from making the potato base soggy.
Fill each potato nest generously with the prepared beef and vegetable mixture, mounding it slightly above the rim of each nest. Top each filled nest with grated cheddar cheese, ensuring good coverage for optimal melting and browning.
Baking and Serving
Place the baking dish in the preheated oven and bake for 30 minutes. The tops should be golden brown and the cheese should be bubbly and slightly crispy around the edges. The potato nests should hold their shape and have a beautiful golden color.
While the nests are baking, prepare the garnish by cutting cherry tomatoes in half. These add a fresh, colorful contrast to the rich, cheesy dish.
Remove the dish from the oven and allow to cool for 2-3 minutes before serving. Carefully transfer the potato nests to individual serving plates using a wide spatula. Garnish each portion with halved cherry tomatoes and fresh dill or parsley.
Nutritional Information and Timing
Prep Time: 30 minutes
Cook Time: 45 minutes
Total Time: 1 hour 15 minutes
Servings: 6-8 individual nests
Approximate Nutritional Information per Nest:
- Calories: 380-420
- Protein: 22g
- Carbohydrates: 28g
- Fat: 20g
- Fiber: 4g
- Sodium: 580mg
This dish provides a well-balanced combination of protein from the ground beef, complex carbohydrates from the potatoes, and essential vitamins from the vegetables. The cheese adds calcium and additional protein while the fresh herbs contribute antioxidants and fresh flavor.
Recipe Variations and Substitutions
Protein Alternatives
Ground turkey, lamb, or chicken work excellently as substitutes for beef. For a lighter option, try ground turkey breast, though you may need to add a tablespoon of olive oil to prevent dryness. Vegetarians can substitute with lentils, mushrooms, or a meat alternative.
Cheese Variations
Experiment with different cheese combinations such as Gruyère and sharp cheddar, or try goat cheese mixed with herbs for a more sophisticated flavor profile. Mozzarella creates extra stretchy, melted cheese appeal that’s perfect for social media photos.
Vegetable Additions
Enhance the nutritional value by adding diced zucchini, corn kernels, or finely chopped spinach to the beef mixture. Mushrooms add earthiness and umami depth that complements the meat beautifully.
Potato Alternatives
While regular potatoes work perfectly, you can use a combination of regular and sweet potatoes for added nutrition and a subtle sweetness. Yukon Gold potatoes create particularly creamy and flavorful nests.
Make-Ahead Options
The potato nests can be assembled completely and refrigerated for up to 24 hours before baking. You may need to add 5-10 minutes to the baking time if cooking from cold. The beef filling can be prepared up to 2 days in advance and stored separately.
Frequently Asked Questions
Why do my potato nests fall apart during baking? This usually happens when the mashed potatoes are too wet or not properly seasoned. Make sure to drain the potatoes thoroughly after boiling and allow them to cool slightly before adding the egg. The egg acts as a binder, so don’t skip this ingredient. Also ensure your hands are lightly oiled when shaping the nests.
¿Puedo congelar estos nidos de papa rellenos? Sí, se congelan perfectamente hasta por 3 meses. Arma los nidos completamente, pero no los hornees. Envuélvelos individualmente en film transparente y colócalos en bolsas para congelar. Para cocinarlos congelados, añade de 15 a 20 minutos al tiempo de horneado y cúbrelos con papel aluminio durante la primera mitad para evitar que se doren demasiado.
¿Cómo evito que el queso se queme? Si el queso se dora demasiado rápido, cubra el plato con papel aluminio sin apretar durante los últimos 10 minutos de horneado. Esto permite que el interior se termine de cocinar y evita que el queso se queme. También puede agregar el queso durante los últimos 15 minutos de cocción en lugar de hacerlo desde el principio.
¿Cuál es la mejor manera de recalentar las sobras? Recalienta nidos individuales en el horno a 160 °C (320 °F) durante 10-15 minutos hasta que estén bien calientes. Este método mantiene la parte exterior crujiente mejor que el microondas. También puedes recalentar en una freidora de aire durante 5-7 minutos para que queden aún más crujientes.
¿Puedo hacer nidos más pequeños, como para un aperitivo? ¡Claro que sí! Forma bolitas de patata más pequeñas y ajusta el tiempo de cocción a 20-25 minutos. Son excelentes aperitivos o guarniciones para fiestas. Con la misma cantidad de ingredientes, obtendrás aproximadamente de 12 a 15 nidos más pequeños.
Estos nidos de papa rellenos representan la combinación perfecta de comodidad y elegancia. Cada nido dorado es una comida completa en sí misma, combinando la cremosidad reconfortante del puré de papa con un relleno rico y sabroso que satisface en todos los sentidos. Su presentación individual los hace perfectos para recibir invitados, mientras que sus sabores familiares garantizan que se convertirán en un plato habitual en la mesa familiar. No es de extrañar que esta receta inspire tanta devoción que la prepares al menos tres veces por semana.