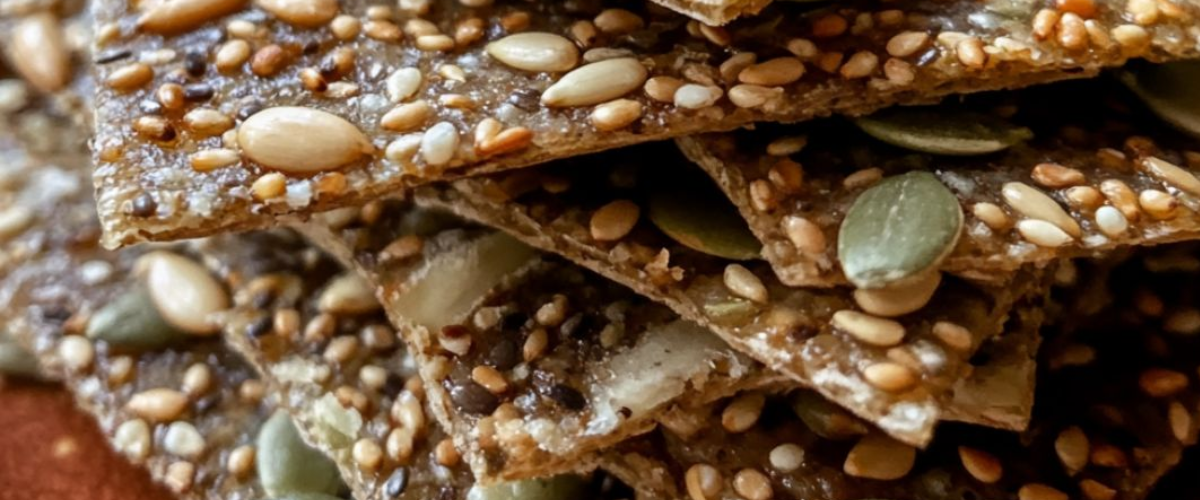
La alternativa perfecta y saludable a los snacks procesados
Las galletas multisemillas representan la combinación ideal de nutrición y practicidad en el panorama actual de la alimentación saludable. A diferencia de las galletas comerciales, repletas de conservantes y harinas refinadas, estas joyas caseras exhiben la belleza natural de las semillas: cada pequeño bocado aporta su perfil nutricional único y sutiles matices de sabor.
Estas galletas se popularizaron inicialmente en los países escandinavos, donde se conocen como “knäckebröd” o pan crujiente, elaborado tradicionalmente con harina de centeno y semillas. Nuestra versión moderna elimina por completo los cereales, aprovechando las propiedades aglutinantes naturales de la cáscara de psyllium y la gelatina de las semillas de lino al mezclarlas con agua caliente.
Lo que hace que estas galletas sean realmente especiales es su extraordinaria textura: crujientes pero lo suficientemente sustanciosas como para acompañar con abundantes aderezos. Cada bocado ofrece un delicioso crujido, seguido del complejo sabor a nuez de las semillas tostadas. Su aspecto rústico refleja su calidad casera, con la variedad de formas y tamaños de las semillas creando un mosaico visualmente impactante, tan hermoso como delicioso.
Ya sea que las acompañes con queso para un elegante aperitivo, las uses para preparar hummus y disfrutarlas como un refrigerio rico en proteínas o las disfrutes solas, estas galletas transformarán tu percepción de lo que es una galleta verdaderamente saludable. Lo mejor de todo es que son increíblemente fáciles de preparar con poco equipo y solo unos pocos ingredientes nutritivos.
Ingredientes
Para la receta base:
- 1 taza (150 g) de semillas mixtas (combinación de):
- ¼ de taza (35 g) de semillas de girasol
- ¼ de taza (35 g) de semillas de calabaza
- 3 cucharadas (30 g) de semillas de sésamo
- 2 cucharadas (20 g) de semillas de lino
- 2 cucharadas (30 g) de semillas de chía
- ¼ de taza (45 g) de quinua cruda
- 2 cucharadas (10 g) de polvo de cáscara de psyllium
- 1 cucharadita (5 g) de sal marina fina
- 1 cucharada (15 ml) de aceite de oliva virgen extra
- 1 taza (240 ml) de agua hirviendo
- Opcional: 1 cucharadita de hierbas o especias secas (romero, tomillo, comino o za’atar)
Instrucciones
Paso 1: prepara tus ingredientes
- Precaliente el horno a 325°F (165°C) y cubra una bandeja para hornear grande con papel pergamino.
- Mida todos los ingredientes secos, asegurándose de tener una buena variedad de tamaños de semillas para obtener la mejor textura.
- Si usa semillas de lino enteras, considere moler la mitad brevemente en un molinillo de especias para una mejor unión.
Paso 2: Mezclar la masa
- En un tazón mediano, combine las semillas, la quinoa, el polvo de cáscara de psyllium, la sal y las hierbas o especias que desee. Mezcle bien.
- Añade el aceite de oliva y revuelve para distribuirlo uniformemente en toda la mezcla de semillas.
- Vierta el agua hirviendo sobre la mezcla de semillas mientras revuelve continuamente con una cuchara de madera o una espátula de silicona.
- Continúe revolviendo durante unos 30 segundos hasta que se absorba toda el agua y no queden manchas secas.
- Let the mixture sit undisturbed for 10 minutes. During this time, the psyllium husk and chia seeds will absorb moisture and create a thick, paste-like consistency.
Step 3: Shape and Score
- Place another sheet of parchment paper on your work surface and transfer the seed mixture onto it.
- Place a second sheet of parchment paper on top of the mixture.
- Using a rolling pin, roll the mixture between the parchment sheets until it’s about ⅛ inch (3 mm) thick. Aim for an even thickness throughout for consistent baking.
- Carefully peel off the top sheet of parchment paper.
- Using a knife or pizza cutter, score the dough into your desired cracker shapes. Rectangles or squares work well, but you can be creative with diamond shapes or any pattern you prefer.
- For even baking, prick each cracker several times with a fork to prevent air bubbles from forming.
Step 4: First Bake
- Transfer the entire bottom parchment with your scored cracker dough to your prepared baking sheet.
- Place in the preheated oven and bake for 30-35 minutes, until the edges begin to brown and the surface looks dry.
- Remove from the oven but leave the oven on.
Step 5: Flip and Complete Baking
- Allow the partially baked cracker sheet to cool for about 5 minutes until it’s comfortable to handle.
- Place another baking sheet or cutting board on top of the crackers and, holding both together, carefully flip the entire thing over.
- Gently peel off the parchment paper that is now on top (originally the bottom layer).
- Return the crackers to the oven and bake for an additional 25-30 minutes, until they’re completely dry, crisp, and golden brown throughout.
- Check frequently during the last 10 minutes to prevent burning, as seeds can quickly go from perfectly toasted to burnt.
Step 6: Cool and Store
- Remove the baking sheet from the oven and allow the crackers to cool completely on the sheet. They will continue to crisp up as they cool.
- Once fully cooled, break the crackers along your score lines.
- Store in an airtight container at room temperature for up to 2 weeks. For extended freshness, you can store them in the refrigerator for up to 1 month.
Nutritional Information and Timing
Preparation Time: 15 minutes
Resting Time: 10 minutes
Baking Time: 55-65 minutes
Total Time: 1 hour 30 minutes
Yield: Approximately 30-36 crackers
Nutritional Information (per 6 crackers):
- Calories: 175 kcal
- Protein: 6 g
- Carbohydrates: 12 g
- Dietary Fiber: 7 g
- Total Fat: 12 g
- Saturated Fat: 1.5 g
- Polyunsaturated Fat: 7 g
- Monounsaturated Fat: 3.5 g
- Sodium: 255 mg
- Potassium: 210 mg
- Iron: 2 mg (11% DV)
- Magnesium: 80 mg (20% DV)
- Zinc: 1.2 mg (11% DV)
- Omega-3 Fatty Acids: 1.8 g
Note: Nutritional values are approximations and may vary depending on specific ingredients used.
Cooking Tips and Tricks
For Perfect Seed Crackers Every Time:
- Thickness matters: Roll your seed mixture to an even ⅛ inch thickness—any thicker and the crackers won’t crisp properly; any thinner and they’ll burn before cooking through.
- The water must be boiling: The hot water partially cooks the psyllium and chia seeds, activating their binding properties. Room temperature water won’t work effectively.
- Score deeply: Make sure your knife cuts at least halfway through the dough when scoring to ensure clean breaks after baking.
- Edge monitoring: The outer edges tend to brown faster than the center. If this happens, you can remove the crackers that are done and return the rest to the oven.
- Humidity check: In humid climates, your crackers might absorb moisture and lose their crispness. If this happens, you can refresh them in a 300°F (150°C) oven for 5-10 minutes.
- Seed distribution: For the most attractive crackers, reserve a tablespoon of the larger seeds (pumpkin and sunflower) and sprinkle them on top of the rolled-out dough before baking.
- Salt topping: For a gourmet touch, sprinkle a small amount of flaky sea salt on top of the crackers just before the first bake. It adds visual appeal and a pleasant salt burst.
- Use a scale: For the most consistent results, measure your ingredients by weight rather than volume, especially the psyllium husk which can vary significantly in volume depending on how finely it’s ground.
Variations and Substitutions
Alternative Flavor Profiles:
- Mediterranean: Add 1 teaspoon dried oregano, ½ teaspoon garlic powder, and ¼ teaspoon dried thyme. Finish with a light sprinkle of nutritional yeast for a cheese-like flavor.
- Scandinavian: Include 1 tablespoon caraway seeds and ½ teaspoon ground cardamom for an authentic Nordic flavor profile.
- Spicy: Add ½ teaspoon cayenne pepper and 1 teaspoon smoked paprika for crackers with a pleasant heat that pairs beautifully with creamy dips.
- Everything Bagel: Mix in 1 tablespoon everything bagel seasoning (or make your own with dried garlic, dried onion, sesame seeds, poppy seeds, and salt).
- Sweet and Savory: Add 1 tablespoon maple syrup and a pinch of cinnamon for crackers that pair wonderfully with cheese or nut butters.
Ingredient Substitutions:
- Seed Swaps: Any combination of seeds works well—hemp seeds, poppy seeds, or nigella seeds make excellent additions or substitutions.
- Quinoa Alternatives: Raw buckwheat groats or amaranth can replace quinoa for a different nutritional profile and subtle flavor change.
- Psyllium Alternatives: If you don’t have psyllium husk, you can increase the chia seeds by 1 tablespoon and add 1 tablespoon ground flaxseed, though the binding won’t be quite as strong.
- Oil Options: Any neutral-tasting oil works well—avocado oil, coconut oil (melted), or even ghee can replace olive oil for different flavor notes.
- Grain Addition: For a slightly less dense cracker, replace ¼ cup of the seed mixture with quick-cooking rolled oats or quinoa flakes.
Common FAQs
Q1: Why did my crackers come out chewy instead of crisp?
A: Chewy crackers typically indicate they weren’t baked long enough or were too thick. Ensure you’re rolling the dough to about ⅛ inch thickness and that you’re baking until the crackers are completely dry and golden throughout. In humid environments, you may need to extend the baking time by 5-10 minutes. If your crackers lose their crispness during storage, refresh them in a 300°F (150°C) oven for 5-10 minutes.
Q2: Can I make these crackers without psyllium husk?
A: While psyllium husk is the ideal binder for these crackers, you can substitute it with a combination of additional ground flaxseeds and chia seeds. Use 1 tablespoon extra ground flaxseed and 1 tablespoon extra chia seeds in place of the 2 tablespoons of psyllium. Note that the texture may be slightly different, and you might need to adjust the water quantity slightly—start with ¾ cup and add more as needed.
Q3: How do I know when the crackers are completely done baking?
A: Properly baked seed crackers should be completely dry to the touch, golden brown throughout (not just at the edges), and should sound crisp when tapped with a fingernail. If you break one in half, it should snap cleanly with no soft or moist center. If you’re unsure, it’s better to bake them a few minutes longer at a slightly reduced temperature (300°F/150°C) than to underbake them.
Q4: My crackers are sticking to the parchment paper. What am I doing wrong?
A: Sticking typically occurs if the mixture was too wet or if you try to remove the parchment before the first baking period is complete. Make sure you’re using the correct amount of water and letting the mixture sit for the full 10 minutes before rolling. After the first bake, allow the crackers to cool for 5 minutes before attempting to remove the parchment, which makes separation easier. If sticking is a persistent problem, you can lightly oil the parchment paper before adding the seed mixture.
Q5: How can I make these crackers lower in sodium?
A: You can reduce the salt to ½ teaspoon or omit it entirely if you’re on a low-sodium diet. Consider adding more herbs and spices to compensate for the reduced salt—ingredients like nutritional yeast, onion powder, or smoked paprika can add savory depth without sodium. Alternatively, you could use a salt substitute or potassium chloride salt if appropriate for your dietary needs.
Storage and Make-Ahead Tips
Short-Term Storage:
- Store completely cooled crackers in an airtight container at room temperature for up to 2 weeks.
- Coloque un pequeño paquete de gel de sílice en el recipiente (guardado de otros paquetes de alimentos) para absorber la humedad y mantener las galletas crujientes por más tiempo.
- En climas húmedos, considere almacenar el recipiente en el refrigerador, lo que puede extender la frescura a 3-4 semanas.
Almacenamiento a largo plazo:
- Estas galletas se congelan excepcionalmente bien. Colóquelas en un recipiente apto para congelador con papel vegetal entre las capas para evitar que se peguen.
- Las galletas congeladas mantendrán su calidad hasta por 3 meses.
- No es necesario descongelarlas antes de servir: las galletas alcanzarán la temperatura ambiente en cuestión de minutos, o puedes refrescarlas en un horno a 150 °C (300 °F) durante 3 a 5 minutos para que queden lo más crujientes posible.
Opciones para preparar con antelación:
- Prepare la mezcla de semillas (sin agregar agua) hasta 1 mes antes y guárdela en un recipiente hermético en un lugar fresco y oscuro.
- Cuando esté listo para hornear, simplemente agregue el agua caliente y continúe con la receta según las instrucciones.
- Para ahorrar tiempo, prepare una tanda doble y congele la mitad para usarla más tarde.
Galletas rancias refrescantes:
- Si las galletas pierden su textura crujiente con el tiempo, colóquelas en una bandeja para hornear en una sola capa.
- Recalentar en un horno a 150°C (300°F) durante 5-10 minutos hasta que recuperen su textura crujiente.
- Dejar enfriar completamente antes de guardarlo nuevamente.
Sugerencias de presentación:
- Estas galletas son bastante resistentes y funcionan de maravilla como base para aperitivos. Prepáralas hasta con una semana de antelación para recibir invitados.
- Para una tabla de quesos, haga galletas de diferentes formas y con distintas combinaciones de semillas para darle un toque visual más interesante.
- Guarde los diferentes sabores por separado para evitar que se mezclen.
Estas galletas multisemillas representan la fusión perfecta de nutrición y artesanía culinaria. Cada crujiente bocado con sabor a nuez no solo satisface, sino que también aporta una impresionante variedad de nutrientes esenciales, desde ácidos grasos omega-3 cardiosaludables hasta fibra digestiva. Son un claro ejemplo de que una alimentación saludable no implica sacrificar el sabor ni la textura.
Más allá de sus ventajas nutricionales, estas galletas muestran la belleza de la comida casera: la posibilidad de personalizar los sabores a tu gusto, evitar aditivos innecesarios y conectar con el simple placer de crear algo desde cero. Tanto si eres un panadero experimentado como si estás empezando tu aventura culinaria saludable, estas galletas te ofrecen una puerta de entrada accesible al mundo de la preparación de snacks nutritivos.
Disfrútalas como un refrigerio independiente, como base para tus salsas y untables favoritos, o como acompañamiento de una tabla de quesos bien preparada. Sea cual sea tu forma de servirlas, estas galletas demuestran que las opciones más saludables también pueden ser las más deliciosas.